Higgsfield × Blender × Seedance 2.5 完整工作流
Higgsfield × Blender × Seedance 2.5 — the complete workflow
夕陽遊艇與海豚 17 秒短片。Blender 排方塊 → 手機當攝影機拍運鏡 → 灰模丟給 Seedance 當運動參考。每一段 prompt 完整公開。
A 17-second film of a sunset yacht and a pod of dolphins. Block it out in Blender, shoot the camera move with your phone, hand the grey previz to Seedance as motion reference. Every prompt, in full.
這個流程在幹嘛
What this is
先在 Blender 用方塊把鏡頭排出來,手持拍一遍運鏡。那段醜醜的灰模就是 Seedance 的運動參考——它照著你的參考圖,把寫實畫面包在灰模上面。
Block the shot out in Blender with boxes, then shoot the camera move by hand. That ugly grey previz is Seedance's motion reference — it wraps a photoreal image around it using your reference plates.
所以船往哪開、海豚第幾秒跳、鏡頭停在哪,全是你決定的,不是抽的。
So where the boat goes, which second the dolphins jump, where the camera sits — you decide all of it. Nothing is rolled for.
Blender 排場景:船、海、海豚、城市,方塊跟球就夠。
Block out the scene in Blender: boat, sea, dolphins, skyline. Boxes and spheres are enough.
Phone Camera 手持拍運鏡,灰模 render 成影片。
Shoot the camera move handheld with Phone Camera, render the previz to video.
Higgsfield 生三張參考圖:角色、船、海豚。
Generate three plates in Higgsfield: character, boat, dolphins.
Seedance 2.5:灰模 + 參考圖 + prompt = 17 秒成片。
Seedance 2.5: previz + plates + prompt = the finished 17 seconds.
你會需要的東西
What you need
- Blender(免費)— blender.org/download
- Blender (free) — blender.org/download
- Higgsfield 的 Blender 外掛 — higgsfield.ai · Blender Camera
- Higgsfield's Blender add-on — higgsfield.ai · Blender Camera
- Higgsfield Bridge MCP for Claude — 讓 Claude 直接動 Blender,你不用自己拉方塊。
- Higgsfield Bridge MCP for Claude — lets Claude build the Blender scene for you.
- Higgsfield 帳號 — 靜圖用 Soul,影片用 Seedance 2.5 — higgsfield.ai
- A Higgsfield account — Soul for stills, Seedance 2.5 for video — higgsfield.ai
- 一支手機 — 不用裝 app,外掛裡的 Phone Camera 掃 QR 就能用。
- A phone — no app to install. The add-on's Phone Camera runs from a QR code.
Blender —— 把鏡頭用方塊排出來
Blender — block the shot out
把下面整段貼給 Claude Code,它會寫一支 build_scene.py,headless 跑完就有場景。腳本能重跑——速度、超車秒數、海豚幾隻,改數字就重生。(也可以接 Bridge MCP,讓 Claude 直接動你開著的 Blender。)
Paste the whole thing below into Claude Code. It writes a build_scene.py, you run Blender headless, and the scene exists. Because it's a script you can re-run it — change the speed, the overtake second, the number of dolphins, and rebuild. (Or connect the Bridge MCP and let Claude drive the Blender you already have open.)
它長得很嚇人,但你只要整段複製。醜就是重點:
It looks terrifying. You only have to copy it. Ugly is the point:
在 Blender 5.x 裡用 Python 腳本做一個「遊艇夕陽 blockout」場景。只能用 box / sphere /
cylinder / cone / torus 這類基本體,不准用任何外掛、資產庫、生成式素材。寫成一支可以重複
執行的 headless 腳本 `build_scene.py`,跑完存成 `.blend`,最後印出自我檢查結果。

執行方式(Mac 範例,路徑自己換):
`"/Applications/Blender.app/Contents/MacOS/Blender" -b --python build_scene.py`

## 座標與方位

`+Y` = 船首方向 `+X` = 右舷 `+Z` = 上 水面 `z = 0`,單位公尺。
駕駛在**右舷**、副駕在**左舷**。這個安排是刻意的:鏡頭轉向駕駛時背後是右岸天際線,
副駕自己這側是左岸天際線,兩側都有城市;而遊艇走右線超車時,海豚會從副駕這一側擦過去。

## 場景設定

24 fps、frame 1–480(正好 20.0 秒)、EEVEE、1920×1080、view transform 用 AgX。
在時間軸放三個 marker:`LANE_CHANGE`(157)、`10s`(241)、`OVERTAKE`(265)。
Collection 分成 `ENV` / `CITY` / `YACHT` / `DRIVER` / `DOLPHINS` / `CAMERAS`。

## 環境

**海**:一塊 24000×24000 的平板放在 z=−0.01。材質 base color (0.005, 0.017, 0.038)、
roughness 0.24、**IOR 1.12、Specular IOR Level 0.22**(這兩個一定要壓低,否則掠射角的
菲涅耳會把天空整片鏡射成死白)。接一個 Noise Texture(Scale 0.16、Detail 6)走 Object
座標進 Bump(Strength 0.40、Distance 0.30)當浪。不要做位移,保持平面。

**天空**:World 用 Sky Texture,`sky_type='MULTIPLE_SCATTERING'`、sun_elevation 3.2°、
sun_disc 開、sun_size 1.6°、sun_intensity 1.2、air_density 1.5、ozone_density 2.0、
altitude 20。太陽要落在**船首正前方偏右一點點**(水平方向目標向量 `(0.06, 1.0, 0)`),
這樣水面會有一條光路直接朝鏡頭來,海豚跳起來剛好逆光剪影。

太陽方位的對法很重要:把 `sun_rotation` 從 0 掃到 2π 取 720 個樣本,每次讀回
`node.sun_direction`,挑水平方位最接近目標向量的那一個。這樣 Sun 燈跟天空裡看得到的
太陽盤永遠一致,不用猜 Blender 的角度慣例。

**燈**:一盞 Sun,energy 5.0、色溫暖橘 (1.0, 0.38, 0.13)、angle 2°,方向用上面算出來的
`-sun_direction` 對過去。再一盞很弱的 Sun 當天空補光,energy 0.22、藍色 (0.35, 0.50, 0.85)、
rotation (52°, 0, 200°)。

## 城市(兩岸都要)

`random.Random(7)`。左右兩側各做一條碼頭平台:x 從 ±128 到 ±560、y 從 −400 到 900、
z 從 −1.0 到 2.6,深灰色。每側再放三排大樓,參數 (x範圍, 高度範圍, y間距):

- 第一排 `(134~166, 22~70, 30)`
- 第二排 `(186~244, 40~125, 38)`
- 第三排 `(266~372, 55~180, 46)`

每排從 y=−240 排到 y=780,每棟平面 15~30 × 15~32,灰階 0.05~0.20 隨機(夕陽逆光要壓暗才
會有剪影感),18% 機率在樓頂加一根 8~30 公尺的尖塔。中間留下的水道寬約 260 公尺,剛好
把太陽夾在正中間。

## 遊艇(12 公尺,開放駕駛艙,全部 parent 到一個叫 `YACHT_ROOT` 的 empty)

**船體**用五個橫斷面 loft 出來,每個斷面四個點 (y, 上緣半寬, 下緣半寬, 底部z, 頂部z):

```
(-6.0, 1.75, 1.35, -0.85, 0.72)
(-1.0, 1.80, 1.30, -0.95, 0.74)
( 3.0, 1.60, 0.85, -0.85, 0.78)
( 5.2, 1.05, 0.35, -0.45, 0.86)
( 6.3, 0.18, 0.12, -0.05, 0.96)
```

相鄰斷面之間接四邊形,前後各補一個蓋子。船底面重心低於 z=−0.1 的面改用深色材質當吃水線。
船體白 (0.78, 0.78, 0.80),深色 (0.10, 0.12, 0.16)。

**甲板與上層**(都用 min/max 兩個角點定義的方盒):

- 甲板 `(-1.60, -5.50, 0.58) → (1.60, 4.80, 0.80)`,柚木色 (0.52, 0.40, 0.26)
- 舷緣 兩側 `(±1.58~±1.80, -5.95, 0.66) → (…, 5.30, 1.00)`
- 船尾板 `(-1.78, -6.08, 0.66) → (1.78, -5.88, 1.06)`
- 前艙 `(-1.05, 2.10, 0.62) → (1.05, 4.30, 1.18)`
- 前艙蓋 `(-0.45, 3.10, 1.17) → (0.45, 3.95, 1.22)`
- 錨機 `(-0.16, 5.30, 0.86) → (0.16, 5.70, 1.02)`
- 繫纜樁 兩側 x=±1.30、y 4.55~4.85、z 0.80~0.90
- 船身腰線 兩側 x ±1.72~±1.805、y −5.9~5.0、z 0.34~0.46
- 中控台 `(-1.45, 0.90, 0.80) → (1.45, 1.75, 1.32)`
- 儀表板 `(-1.50, 0.82, 1.26) → (1.50, 1.80, 1.36)`

**擋風玻璃**(矮的,坐著要能看過去,這點很關鍵):傾角 −26°。玻璃 2.90×0.04×0.44 放在
(0, 1.63, 1.51);上緣橫桿 3.00×0.09×0.07 放在 (0, 1.545, 1.705);兩側立柱
0.07×0.08×0.46 在 x=±1.46;兩側小翼 0.04×0.32×0.30 在 x=±1.50、y=1.44、z=1.46,
再各繞 Z 轉 ∓18°。玻璃材質 alpha 0.10、`surface_render_method='BLENDED'`、IOR 1.15。

**防滾架**:兩支 r=0.055 的圓柱從 (±1.35, −1.75, 0.80) 拉到 (±1.05, −1.95, 2.55),
頂端一根橫桿連起來,上面放一個 0.5×0.22×0.16 的天線盒在 (0, −1.95, 2.66)。

**船首欄杆**:兩側從 (±1.5, 4.6, 1.05) 拉到 (±0.35, 6.05, 1.15) 的細圓柱 r=0.035,
中間加三根 r=0.028 的立柱。

**座椅**(`SEAT_X = 0.95`,右舷駕駛、左舷副駕,兩邊對稱各一組):
坐墊 x ±0.28、y −0.42~0.30、z 0.80~1.20;椅背 y −0.56~−0.40、z 1.16~1.92;
底座 x ±0.14、y −0.30~0.10、z 0.80~0.86。

**方向盤**(在右舷):torus major 0.21 / minor 0.026,中心 (0.95, 0.92, 1.56),
繞 X 轉 66°。中央 r=0.05 短圓柱當輪轂,三根 0.20 長的輻條放在 90°/210°/330°,
再一根 r=0.045 的轉向柱從 (0.95, 1.28, 1.26) 接到輪心。旁邊放油門:
底座 0.12×0.20×0.10 在 (0.47, 0.75, 1.37),操縱桿從 (0.47,0.75,1.40) 到 (0.47,0.60,1.62)。

**尾浪**:一片四邊形從 (±1.6, −5.9) 張開到 (±5.5, −34.0),放在 z=0.04,白色微自發光。
船首兩側各一片 0.9×3.4×0.10 的浪花在 (±1.55, 3.8, 0.16),船尾一塊 3.4×2.0×0.10 在
(0, −6.9, 0.10)。

## 駕駛(也 parent 到 `YACHT_ROOT`,全部用方塊和圓柱,X = 0.95)

骨盆 0.40×0.30×0.22 在 (X, −0.14, 1.31);軀幹 0.44×0.28×0.62 在 (X, −0.20, 1.64) 前傾 9°;
脖子從 (X,−0.14,1.90) 到 (X,−0.09,2.00);頭是半徑 (0.115, 0.135, 0.145) 的球在
(X, −0.08, 2.13);頭髮是稍大的球 (0.133, 0.148, 0.155) 放在 (X, −0.135, 2.155)
(**要往後偏,不然接縫會橫過臉**),後面再加一塊 0.16×0.13×0.30 當馬尾。

兩隻手:肩 (X ± 0.20, −0.16, 1.88) → 肘 (X ± 0.26, 0.30, 1.66) → 手 (X ± 0.185, 0.86, 1.60),
手正好搭在方向盤圈上,手掌用小球。兩條腿:髖 (X ± 0.115, −0.05, 1.28) → 膝 (X ± 0.145, 0.52, 1.19)
→ 腳 (X ± 0.145, 0.62, 0.86),腳掌 0.11×0.26×0.07。

## 相機(三台,全部 parent 到 `YACHT_ROOT`,`matrix_parent_inverse` 設成單位矩陣)

**三台都絕對不能有任何 keyframe** —— 它們只是跟著船跑,之後要交給 VirtuCamera 之類的
工具即時操控。clip_start 0.05、clip_end 30000(不設遠裁切會把天際線切掉)。

| 名稱 | 位置 (local) | 鏡頭 | 靜止俯角 |
|---|---|---|---|
| `CAM_PASSENGER` | (−0.95, 0.0, 2.02) | 28mm | 4° 俯 |
| `CAM_PASSENGER_FWD` | (−0.95, 0.0, 2.02) | 28mm | 水平 |
| `CAM_DRIVER` | (+0.95, 0.10, 2.14) | 24mm | 13° 俯 |

`CAM_DRIVER` 故意放在駕駛臉的正前方一點點:他的頭落在 near clip 裡不會入鏡,但他自己的
雙手、方向盤上緣、儀表台都在畫面裡,是真正的 POV。`CAM_PASSENGER` 設為 scene camera。

## 海豚(33 隻)

單隻由這些基本體組成(長約 3.6 公尺):
- 身體:球,半徑 (0.24, 1.30, 0.28)
- 腹部:球 (0.17, 0.95, 0.10) 放在 (0, −0.10, −0.20),比身體亮一點當反影色
- 額隆:球 (0.18, 0.26, 0.19) 放在 (0, 1.10, 0.00)
- 吻部:圓錐 r1=0.085 → r2=0.042、長 0.46,放在 (0, 1.52, −0.06),**繞 X 轉 −90°**
  (轉 +90° 會變成粗端朝前,鼻子就鈍掉了)
- 背鰭:0.05×0.38×0.44 放在 (0, −0.04, 0.38) 後傾 26°,底部要埋進身體裡
- 尾柄:0.12×0.92×0.15 在 (0, −1.36, −0.02);尾鰭:0.86×0.30×0.05 在 (0, −1.80, −0.06) 抬 13°
- 胸鰭:0.38×0.20×0.045 在 (±0.24, 0.52, −0.15),各繞 Y 轉 ±30°、繞 Z 轉 ∓22°

顏色 (0.13, 0.16, 0.20)、roughness 0.26。每隻掛在自己的 empty 底下,動畫只上在 empty。

**排列**(`random.Random(23)`):先放三隻主角,格式是
(橫向x, 縱向偏移dy, 跳躍相位, 體型, 跳躍週期, 蛇行幅度):

```
DOLPHIN_LEAD  (-0.8,  0.0, 0.00, 1.00, 1.70, 0.55)
DOLPHIN_PORT  (-3.6, -3.2, 0.34, 1.05, 1.66, 0.55)
DOLPHIN_STBD  ( 1.1, -4.6, 0.67, 0.95, 1.74, 0.55)
```

接著隨機補到 26 隻:x 取 −17.0~3.4、dy 取 −10.0~30.0、相位隨機、體型 0.80~1.15、
週期 1.50~2.00、蛇行 0.25~0.85。其中 34% 的機率改成「幼豚」——貼在前一隻旁邊
(x 差 ±1.6、dy 差 ±2.2、相位差 ±0.06、體型只有 0.55~0.70)。

最後在右線外側再補 7 隻(總數 33):x 取 12.0~23.0、dy 取 −8.0~30.0,其餘同上。
這樣船超車時是**從魚群中間穿過去**,正前方視角左右兩側都是跳躍的海豚。

## 動畫(只有 `YACHT_ROOT` 和 33 個海豚 empty 有 key,每一格都烤,插值用 LINEAR)

用 `smoothstep(e0, e1, x)`(夾到 0~1 之後 `x*x*(3-2x)`)。

**遊艇**
- 速度 `v(t) = 17.0 + 7.0 * smoothstep(7.0, 9.5, t)` m/s
- 橫向 `x(t) = 7.5 * smoothstep(6.5, 9.2, t)` ← 這就是「切到右線」
- 前進距離對速度做數值積分(每格切 4 個子步),20 秒總共跑 421 公尺
- 上下起伏 `z = 0.05 + 0.06*sin(2πt/1.7) + 0.035*sin(2πt/1.13 + 1.0)`
- 航向 `yaw = -atan2(vx, vy)`
- 側傾 `roll = radians(3.4)*(vx/vy)*8.0 + radians(0.55)*sin(2πt/2.31)`(切線時會壓向內側)
- 縱傾 `pitch = radians(1.6) + radians(0.30)*加速度 + radians(0.45)*sin(2πt/1.93 + 0.7)`

起伏和搖晃刻意做得很輕微,因為相機是黏在船上的,晃太大會暈。

**海豚**:全部固定 14.0 m/s 直線前進。每隻的垂直位置用自己的週期 `per` 和相位 `ph`:

```
p = ((t / per) + ph) % 1.0
p < 0.5 →  z = 2.35 * sin(π * p / 0.5) - 0.55     # 出水的拋物線
p ≥ 0.5 →  z = -0.55 - 0.95 * sin(π * (p-0.5) / 0.5)   # 水面下
```

身體俯仰角直接從自己的垂直速度算:`pitch = atan2(dz/dt, 14.0)`,這樣入水出水的角度會自然。
橫向再加一點蛇行 `x = dx + 蛇行幅度 * sin(2πt/3.3 + ph*6.0)`。

**超車時間點的算法(重點)**:不要手動擺海豚的起始位置。設定 `T_OVERTAKE = 11.0` 秒,
然後**反推**:`海豚起始Y = 遊艇在第11秒的Y - 14.0 * 11.0`(會得到約 52.2)。這樣之後你改
任何速度參數,超車都還是會準確發生在你指定的那一秒。

結果會是:0 秒時魚群在正前方約 50 公尺 → 6.5 秒開始切右線 → 7~9.5 秒加速 17→24 m/s →
10 秒時最近的海豚在左前方 9~13 公尺 → 11 秒正式超過(左舷約 7 公尺)→ 之後甩開,
第 480 格已經領先 90 公尺。

## 腳本結尾要自我檢查並印出來

1. 三台相機都 `animation_data` 是空的(沒有任何 key)、都 parent 到 `YACHT_ROOT`
2. 遊艇 20 秒總行程
3. 第 10 秒和第 20 秒時,領頭海豚跟船首的距離
4. **通過間隙**:掃過所有海豚所有格數,找出「大致並排時」離船體中心線最近的橫向距離,
   assert 要大於 3.0 公尺(船寬只有 1.8 公尺,這條在你之後亂調速度時會救你一命)

## Blender 5.x 一定會踩的坑(先寫對就不用 debug)

- `Action.fcurves` 沒了(改成 slotted action)。要改插值必須走
  `action.layers[].strips[].channelbags[].fcurves`。而且**不要每插一格 key 就重設一次插值**,
  那是 O(n²),全部烤完再統一設一次。
- `ShaderNodeTexSky` 的 `'NISHITA'` 已移除,改用 `'MULTIPLE_SCATTERING'`。
- render engine 的 enum 只剩 `'BLENDER_EEVEE'`(沒有 `_NEXT` 了),最好用
  `bl_rna.properties['engine'].enum_items` 動態判斷。
- `bmesh.ops.create_cone` / `create_uvsphere` 的參數是 `radius1`/`radius2`/`radius`,
  不是舊版的 `diameter*`。
- 材質半透明要設 `material.surface_render_method = 'BLENDED'`。
- 建幾何時直接把真實尺寸做進 mesh 頂點裡,不要靠 object scale 去縮,之後才不會被非等比
  縮放搞死。
- 平面共面會 z-fighting:甲板頂面、船體上緣、艙頂底面這幾層一定要互相錯開個幾公分。
Build a "yacht sunset blockout" scene in Blender 5.x with a Python script. Boxes, spheres,
cylinders, cones and toruses only — no add-ons, no asset libraries, no generated assets.
Write it as one re-runnable headless script `build_scene.py` that saves a `.blend` and
prints self-check results at the end.

Run it with:
`"/Applications/Blender.app/Contents/MacOS/Blender" -b --python build_scene.py`

## Axes

`+Y` = forward (bow) · `+X` = starboard · `+Z` = up · waterline `z = 0`, metres.
Helm/driver on **starboard**, passenger seat on **port**. That split is deliberate: turning
the camera toward the driver puts the starboard skyline behind him, the passenger's own side
carries the port skyline, so both banks are built — and when the yacht overtakes in the right
lane the dolphins sweep past on the passenger's side rather than behind the driver.

## Scene settings

24 fps, frames 1–480 (exactly 20.0 s), EEVEE, 1920×1080, AgX view transform.
Three timeline markers: `LANE_CHANGE` (157), `10s` (241), `OVERTAKE` (265).
Collections: `ENV` / `CITY` / `YACHT` / `DRIVER` / `DOLPHINS` / `CAMERAS`.

## Environment

**Sea**: one 24000×24000 slab at z = −0.01. Base colour (0.005, 0.017, 0.038),
roughness 0.24, **IOR 1.12 and Specular IOR Level 0.22** — both must be low or fresnel at
grazing angles mirrors the whole sky and the water goes white. Feed a Noise Texture
(Scale 0.16, Detail 6) on Object coordinates into a Bump node (Strength 0.40, Distance 0.30)
for chop. No displacement — keep it a flat plane.

**Sky**: World Sky Texture, `sky_type='MULTIPLE_SCATTERING'`, sun_elevation 3.2°,
sun_disc on, sun_size 1.6°, sun_intensity 1.2, air_density 1.5, ozone_density 2.0,
altitude 20. Put the sun **straight down the channel, a hair to starboard** (horizontal
target vector `(0.06, 1.0, 0)`) so the glitter path runs right at the camera and the
dolphins jump backlit against it.

Aim it robustly: sweep `sun_rotation` over 0…2π in 720 steps, read `node.sun_direction`
back each time, and keep the rotation whose horizontal azimuth best matches the target.
That way the Sun lamp and the visible sun disc always agree and you never have to guess
Blender's angle convention.

**Lights**: one Sun, energy 5.0, warm (1.0, 0.38, 0.13), angle 2°, pointed along the
`-sun_direction` you just solved for. Plus a weak cool sky fill: Sun, energy 0.22,
colour (0.35, 0.50, 0.85), rotation (52°, 0, 200°).

## City (both banks)

`random.Random(7)`. A quay slab per side: x from ±128 to ±560, y from −400 to 900,
z from −1.0 to 2.6, dark grey. Then three rows of towers per side, as
(x range, height range, y step):

- row 1 `(134–166, 22–70, 30)`
- row 2 `(186–244, 40–125, 38)`
- row 3 `(266–372, 55–180, 46)`

Each row runs y = −240 to 780, footprints 15–30 × 15–32, greyscale 0.05–0.20 random
(dark, so they silhouette against the backlight), 18% chance of an 8–30 m spire on top.
The channel left between them is ~260 m wide, which frames the sun dead centre.

## The yacht (12 m, open cockpit, everything parented to an empty called `YACHT_ROOT`)

**Hull** is lofted from five cross-sections, four verts each,
(y, half-width top, half-width bottom, z bottom, z top):

```
(-6.0, 1.75, 1.35, -0.85, 0.72)
(-1.0, 1.80, 1.30, -0.95, 0.74)
( 3.0, 1.60, 0.85, -0.85, 0.78)
( 5.2, 1.05, 0.35, -0.45, 0.86)
( 6.3, 0.18, 0.12, -0.05, 0.96)
```

Bridge adjacent sections with quads, cap both ends. Any face whose average z is below −0.1
gets a dark material as the boot-top. Hull white (0.78, 0.78, 0.80), dark (0.10, 0.12, 0.16).

**Deck and superstructure** (boxes defined by min/max corners):

- deck `(-1.60, -5.50, 0.58) → (1.60, 4.80, 0.80)`, teak (0.52, 0.40, 0.26)
- gunwales `(±1.58…±1.80, -5.95, 0.66) → (…, 5.30, 1.00)`
- transom `(-1.78, -6.08, 0.66) → (1.78, -5.88, 1.06)`
- foredeck cabin `(-1.05, 2.10, 0.62) → (1.05, 4.30, 1.18)`
- forehatch `(-0.45, 3.10, 1.17) → (0.45, 3.95, 1.22)`
- windlass `(-0.16, 5.30, 0.86) → (0.16, 5.70, 1.02)`
- cleats at x = ±1.30, y 4.55–4.85, z 0.80–0.90
- hull stripe at x ±1.72…±1.805, y −5.9…5.0, z 0.34–0.46
- console `(-1.45, 0.90, 0.80) → (1.45, 1.75, 1.32)`
- dash `(-1.50, 0.82, 1.26) → (1.50, 1.80, 1.36)`

**Windshield** (low — a seated eye has to see over it, this matters a lot): tilt −26°.
Glass 2.90×0.04×0.44 at (0, 1.63, 1.51); top rail 3.00×0.09×0.07 at (0, 1.545, 1.705);
posts 0.07×0.08×0.46 at x = ±1.46; small side wings 0.04×0.32×0.30 at x = ±1.50, y = 1.44,
z = 1.46, each rotated ∓18° about Z. Glass material: alpha 0.10,
`surface_render_method='BLENDED'`, IOR 1.15.

**Radar arch**: two r = 0.055 cylinders from (±1.35, −1.75, 0.80) to (±1.05, −1.95, 2.55),
joined by a crossbar, with a 0.5×0.22×0.16 antenna pod at (0, −1.95, 2.66).

**Bow rail**: r = 0.035 cylinders from (±1.5, 4.6, 1.05) to (±0.35, 6.05, 1.15), plus three
r = 0.028 stanchions each side.

**Seats** (`SEAT_X = 0.95`, helm to starboard, passenger to port, mirrored pair):
pan x ±0.28, y −0.42…0.30, z 0.80…1.20; back y −0.56…−0.40, z 1.16…1.92;
base x ±0.14, y −0.30…0.10, z 0.80…0.86.

**Wheel** (starboard side): torus major 0.21 / minor 0.026, centred (0.95, 0.92, 1.56),
rotated 66° about X. Hub is a r = 0.05 stub cylinder, three 0.20-long spokes at 90/210/330°,
and a r = 0.045 column from (0.95, 1.28, 1.26) to the hub. Throttle alongside: base
0.12×0.20×0.10 at (0.47, 0.75, 1.37), lever from (0.47, 0.75, 1.40) to (0.47, 0.60, 1.62).

**Wake**: a quad spreading from (±1.6, −5.9) to (±5.5, −34.0) at z = 0.04, white and faintly
emissive. Bow spray 0.9×3.4×0.10 at (±1.55, 3.8, 0.16) each side, stern wash 3.4×2.0×0.10
at (0, −6.9, 0.10).

## The driver (also parented to `YACHT_ROOT`, boxes and cylinders, X = 0.95)

Pelvis 0.40×0.30×0.22 at (X, −0.14, 1.31); torso 0.44×0.28×0.62 at (X, −0.20, 1.64) leaning
forward 9°; neck (X, −0.14, 1.90) → (X, −0.09, 2.00); head is a sphere of radii
(0.115, 0.135, 0.145) at (X, −0.08, 2.13); hair is a slightly larger sphere
(0.133, 0.148, 0.155) at (X, −0.135, 2.155) — **offset it backwards or the intersection seam
cuts straight across the face** — plus a 0.16×0.13×0.30 block behind as a ponytail.

Arms: shoulder (X ± 0.20, −0.16, 1.88) → elbow (X ± 0.26, 0.30, 1.66) → hand
(X ± 0.185, 0.86, 1.60), landing exactly on the wheel rim, with small spheres for hands.
Legs: hip (X ± 0.115, −0.05, 1.28) → knee (X ± 0.145, 0.52, 1.19) → foot
(X ± 0.145, 0.62, 0.86), feet 0.11×0.26×0.07.

## Cameras (three, all parented to `YACHT_ROOT` with `matrix_parent_inverse` set to identity)

**None of them may carry a single keyframe** — they just ride the hull, ready to be driven
live by something like VirtuCamera. clip_start 0.05, clip_end 30000 (without the far clip
the skyline gets cut off).

| name | local location | lens | rest pitch |
|---|---|---|---|
| `CAM_PASSENGER` | (−0.95, 0.0, 2.02) | 28 mm | 4° down |
| `CAM_PASSENGER_FWD` | (−0.95, 0.0, 2.02) | 28 mm | level |
| `CAM_DRIVER` | (+0.95, 0.10, 2.14) | 24 mm | 13° down |

`CAM_DRIVER` sits just in front of the driver's face on purpose: his head falls inside the
near clip and never shows, but his own hands, the top of the wheel rim and the dash are all
in shot — a real POV. Make `CAM_PASSENGER` the scene camera.

## Dolphins (33 of them)

One animal, ~3.6 m long, from these primitives:
- body: sphere, radii (0.24, 1.30, 0.28)
- belly: sphere (0.17, 0.95, 0.10) at (0, −0.10, −0.20), slightly lighter, countershading
- melon: sphere (0.18, 0.26, 0.19) at (0, 1.10, 0.00)
- rostrum: cone r1 = 0.085 → r2 = 0.042, depth 0.46, at (0, 1.52, −0.06),
  **rotated −90° about X** (rotate +90° and the fat end points forward — blunt nose)
- dorsal: 0.05×0.38×0.44 at (0, −0.04, 0.38) raked back 26°, base buried in the body
- peduncle 0.12×0.92×0.15 at (0, −1.36, −0.02); fluke 0.86×0.30×0.05 at (0, −1.80, −0.06)
  pitched up 13°
- pectorals 0.38×0.20×0.045 at (±0.24, 0.52, −0.15), rotated ±30° about Y and ∓22° about Z

Colour (0.13, 0.16, 0.20), roughness 0.26. Each animal hangs under its own empty; animate
only the empty.

**Layout** (`random.Random(23)`): three hero animals first, as
(lateral x, along-track dy, jump phase, size, jump period, weave amplitude):

```
DOLPHIN_LEAD  (-0.8,  0.0, 0.00, 1.00, 1.70, 0.55)
DOLPHIN_PORT  (-3.6, -3.2, 0.34, 1.05, 1.66, 0.55)
DOLPHIN_STBD  ( 1.1, -4.6, 0.67, 0.95, 1.74, 0.55)
```

Then fill randomly up to 26: x in −17.0…3.4, dy in −10.0…30.0, random phase, size 0.80–1.15,
period 1.50–2.00, weave 0.25–0.85. With 34% probability make it a calf instead — tucked
beside the previous animal (x ±1.6, dy ±2.2, phase ±0.06, size only 0.55–0.70).

Finally add 7 more outboard of the lane (33 total): x in 12.0…23.0, dy in −8.0…30.0,
everything else as above. The boat then threads **through** the pod on the pass, and the
forward view has jumping dolphins on both sides.

## Animation (keys only on `YACHT_ROOT` and the 33 dolphin empties, baked every frame, LINEAR)

Use `smoothstep(e0, e1, x)` — clamp to 0…1 then `x*x*(3-2x)`.

**Yacht**
- speed `v(t) = 17.0 + 7.0 * smoothstep(7.0, 9.5, t)` m/s
- lateral `x(t) = 7.5 * smoothstep(6.5, 9.2, t)` ← this is the move into the right lane
- integrate the speed numerically for distance (4 substeps per frame); 421 m over the 20 s
- heave `z = 0.05 + 0.06*sin(2πt/1.7) + 0.035*sin(2πt/1.13 + 1.0)`
- heading `yaw = -atan2(vx, vy)`
- bank `roll = radians(3.4)*(vx/vy)*8.0 + radians(0.55)*sin(2πt/2.31)` (leans into the turn)
- trim `pitch = radians(1.6) + radians(0.30)*acceleration + radians(0.45)*sin(2πt/1.93 + 0.7)`

Keep the bob and roll very subtle — the camera is bolted to the boat and a big swell reads
as motion sickness.

**Dolphins**: all hold 14.0 m/s in a straight line. Vertical position from each animal's own
period `per` and phase `ph`:

```
p = ((t / per) + ph) % 1.0
p < 0.5 →  z = 2.35 * sin(π * p / 0.5) - 0.55            # airborne arc
p ≥ 0.5 →  z = -0.55 - 0.95 * sin(π * (p-0.5) / 0.5)     # submerged
```

Derive body pitch from its own vertical velocity: `pitch = atan2(dz/dt, 14.0)` — entry and
exit angles then come out right for free. Add a little weave:
`x = dx + weave * sin(2πt/3.3 + ph*6.0)`.

**How to place the pod (the important bit)**: don't hand-place their start position. Set
`T_OVERTAKE = 11.0` seconds and **solve backwards**:
`dolphin_start_Y = yacht_Y(at t=11) - 14.0 * 11.0` (comes out around 52.2). Retune any speed
afterwards and the pass still lands exactly on the second you asked for.

The result: at 0 s the pod is ~50 m dead ahead → 6.5 s the lane change starts → 7–9.5 s
throttle up 17 → 24 m/s → at 10 s the nearest dolphins are 9–13 m off the port bow → at 11 s
the pass happens (about 7 m to port) → then it pulls away, 90 m clear by frame 480.

## The script must self-check and print

1. all three cameras have empty `animation_data` (zero keys) and are parented to `YACHT_ROOT`
2. total distance travelled over the 20 s
3. gap between the lead dolphin and the bow at 10 s and at 20 s
4. **pass clearance**: sweep every dolphin over every frame, find the smallest lateral
   distance from the hull centreline while roughly abeam, and assert it is over 3.0 m (the
   beam is only 1.8 m — this check saves you the first time you retune the speeds)

## Blender 5.x traps worth getting right the first time

- `Action.fcurves` is gone (slotted actions). Reach interpolation through
  `action.layers[].strips[].channelbags[].fcurves` — and **don't reset interpolation after
  every single key**, that's O(n²); bake all the keys first, then set it once.
- `ShaderNodeTexSky` has no `'NISHITA'` any more; use `'MULTIPLE_SCATTERING'`.
- The render engine enum is just `'BLENDER_EEVEE'` (no `_NEXT`); read
  `bl_rna.properties['engine'].enum_items` and pick from it rather than hardcoding.
- `bmesh.ops.create_cone` / `create_uvsphere` take `radius1`/`radius2`/`radius`, not the old
  `diameter*` names.
- Transparency needs `material.surface_render_method = 'BLENDED'`.
- Bake real dimensions into the mesh vertices instead of scaling objects — non-uniform object
  scale will bite you later.
- Coplanar faces z-fight: keep the deck top, hull sheer line and cabin underside a few
  centimetres apart from each other.
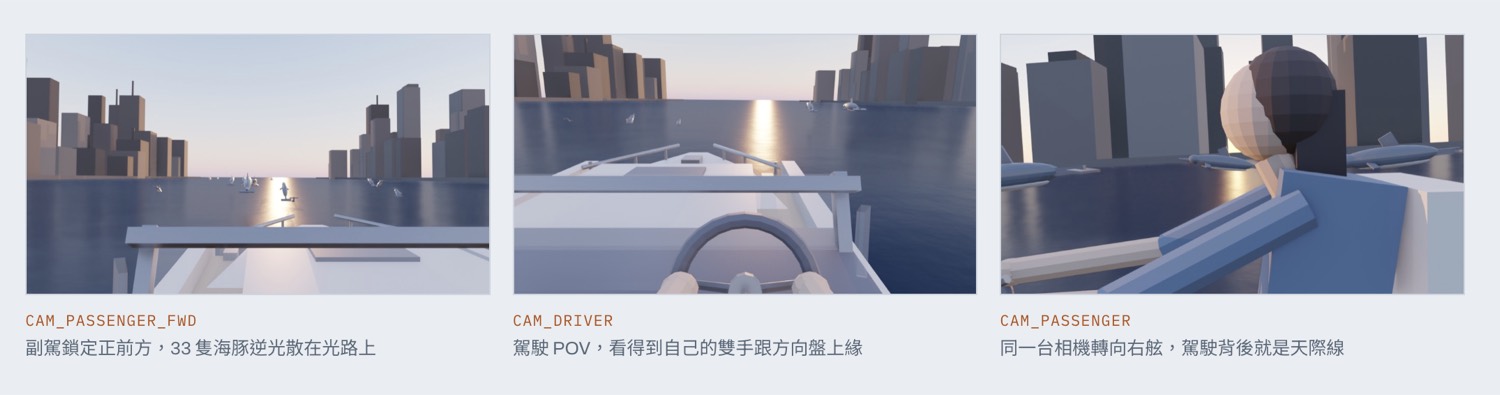
跑完長這樣。船、人、海豚、城市全是方塊跟球——它不用好看,只要位置對:
Here's what comes out. Boat, driver, dolphins, skyline — all boxes and spheres. It doesn't have to look good, it has to be in the right place:
場景裡放了三台相機,都黏在船上,而且一格 keyframe 都沒有——運鏡等一下用手機操。
The scene carries three cameras, all parented to the hull, and not one keyframe between them — the moves come from the phone in a minute.
用手機當攝影機(Phone Camera)
Your phone as the camera
外掛內建,不用裝 app——電腦開一個 server,手機用瀏覽器連進去就變攝影機。
Built into the add-on, no app to install — your machine opens a small server and the phone joins it from a browser.
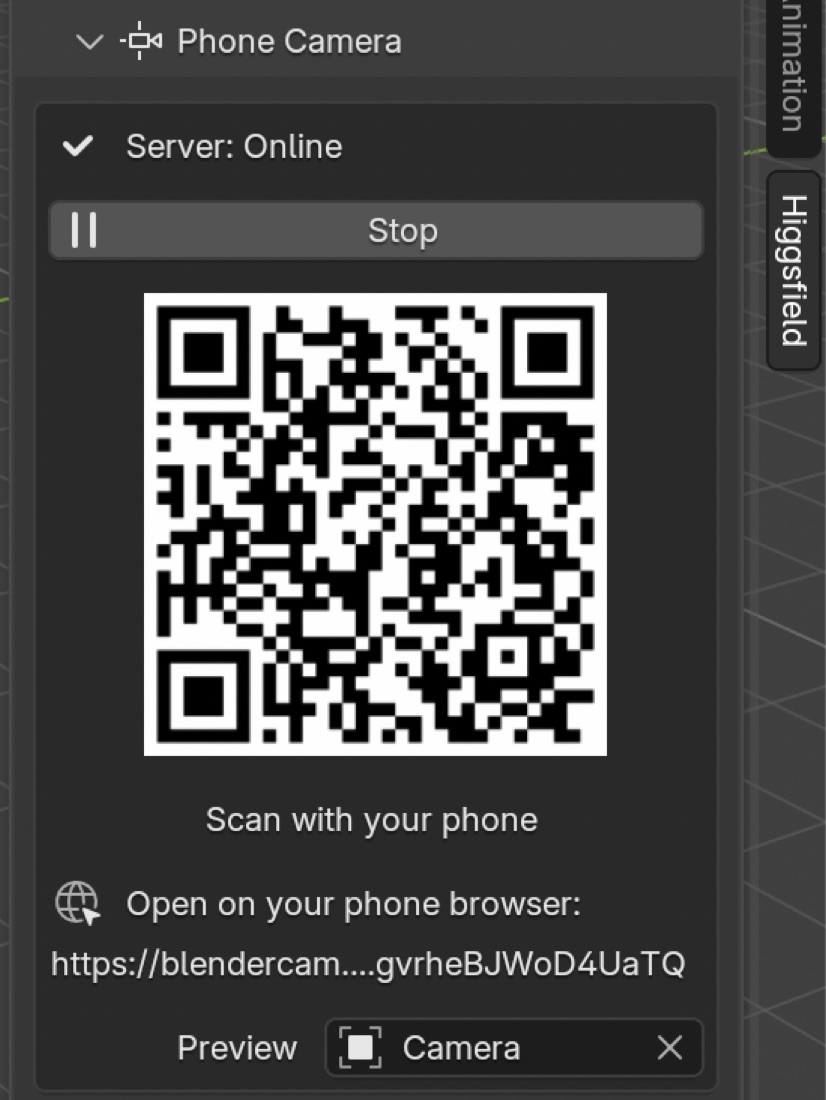
- 右側 Higgsfield 面板 ▸ Phone Camera ▸ Start,看到 Server: Online 就是通了。
- 手機掃 QR(或開那串 blendercam… 網址)。要同一個 Wi-Fi。
- Preview 選要被驅動的那台相機。
- 拿起手機動——pan、tilt、roll,走位、蹲低、舉高都吃得到,相機即時跟著跑。手震感就是這樣來的。
- 拍到滿意就錄下 keyframe,收工按 Stop。
- Higgsfield panel ▸ Phone Camera ▸ Start. Server: Online means you're live.
- Scan the QR (or open that blendercam… URL). Same Wi-Fi.
- Pick the camera to drive under Preview.
- Move the phone — pan, tilt, roll, walk, crouch, lift. The camera follows live, and that's where the handheld feel comes from.
- Keyframe the take you like, then hit Stop.
把灰模輸出成影片
Export the previz
不用調光、不用材質、更不用 Cycles。Output Properties 裡設一下就好:
No lighting, no materials, definitely no Cycles. Just Output Properties:
- 1280 × 720 · 24 fps —— 720p 就夠,檔案小反而好上傳。
- Frame Range 1–480(=20 秒)。
- File Format 選 FFmpeg Video ——不要用預設的 PNG,不然你會拿到 480 張圖。
- Encoding:MPEG-4 / H.264 / Medium。
- 引擎用 Workbench 或 EEVEE,Cycles 只是白等。
- Render ▸ Render Animation(Ctrl + F12)。這支 .mp4 就是第 5 步要丟的。
- 1280 × 720 · 24 fps — 720p is plenty, and a small file uploads cleanly.
- Frame Range 1–480 (= 20 s).
- File Format: FFmpeg Video — not the default PNG, or you get 480 stills.
- Encoding: MPEG-4 / H.264 / Medium.
- Render with Workbench or EEVEE. Cycles is pure waiting.
- Render ▸ Render Animation (Ctrl + F12). That .mp4 is what step 5 wants.
角色設定表 —— 讓主角是你自己
Character sheet — make yourself the lead
照片丟進 Higgsfield,Soul 跑這段,會拿到三格設定表:正臉、側面、無頭全身。這張是影片的身分參考,臉會不會跑掉全看它。
Drop your photos into Higgsfield and run this in Soul. You get a three-panel sheet: face, profile, headless full body. This is the film's identity reference — whether the face holds depends entirely on it.
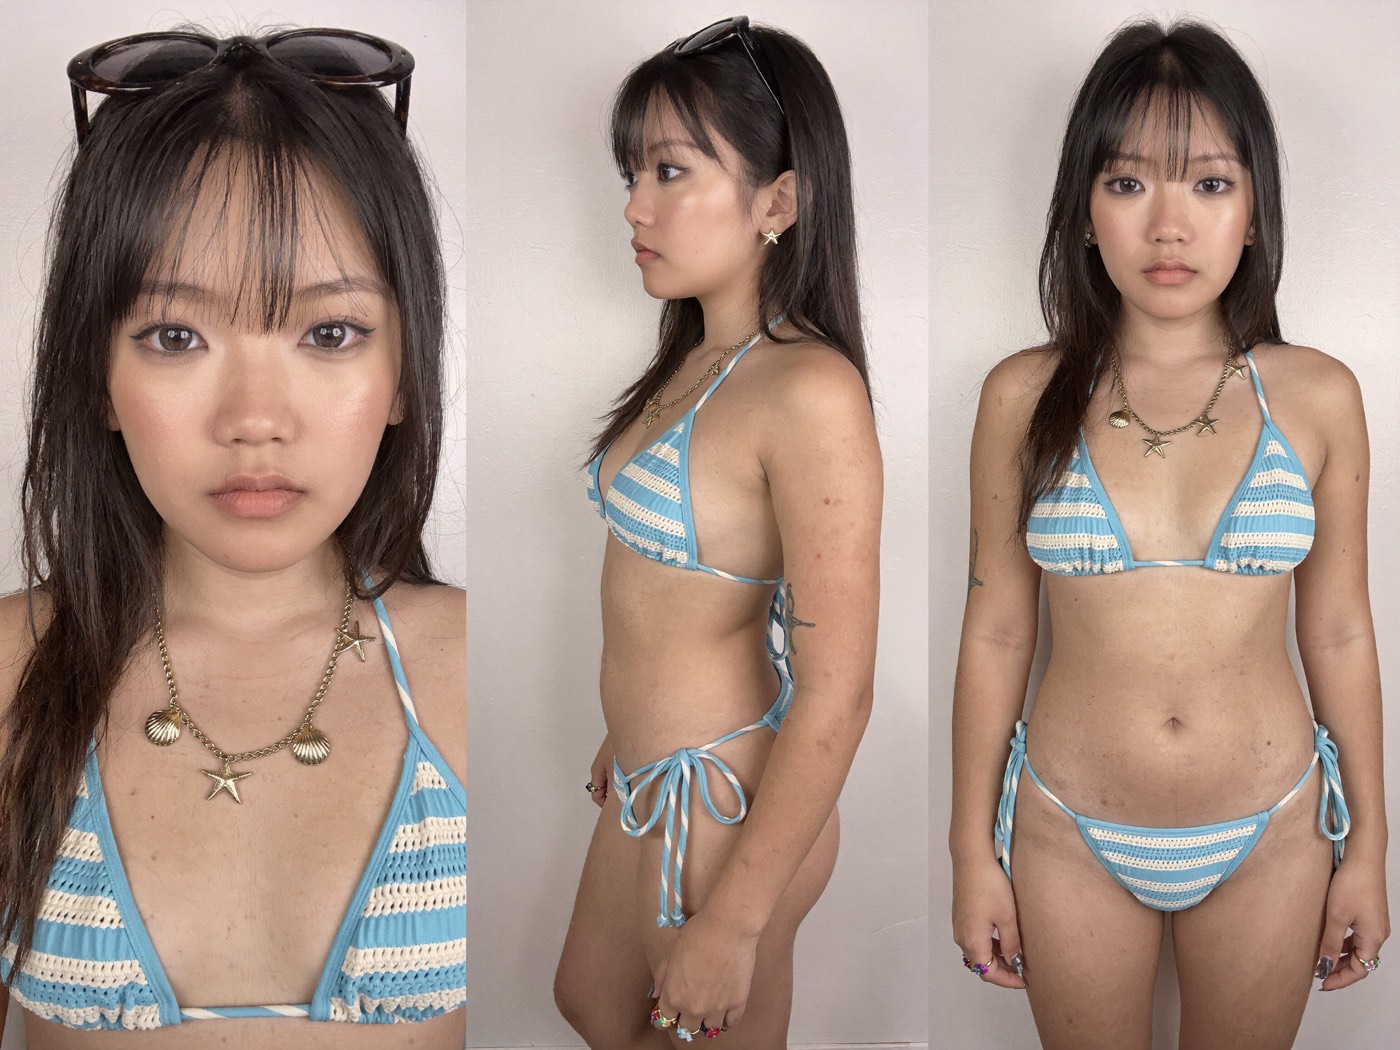
A three-panel character reference sheet composed as one horizontal frame, divided into three equal vertical panels side by side, a thin clean separation between panels, the same girl in the same outfit rendered identically across all three. No text, no labels, no numbering anywhere in the image.

The attached reference carries the face, bone structure, skin tone, build, and proportions. her hair is exactly as it appears in the reference — the same length, the same cut, the same texture, the same part, not restyled and not lengthened — and her facial makeup is exactly as it appears in the reference. y2k cute nails.with sun glasses.

she wears a tiffany blue bikini wearing a blue and cream striped crocheted string bikini. She accessorizes with a detailed gold chain necklace featuring multiple gold seashell and starfish charms, gold starfish stud earrings, and colorful beaded rings on her fingers.  No eyewear of any kind, no hat, no jacket, no outer layer, no bag, no logos and no graphics. The outfit is identical in every panel — the same print at the same scale

LEFT PANEL — keep the bang lower to eyebrow ,pinky lip, more blush on chicks ,tight chest-up face detail, front. Framed from just above the crown down to the collarbones with the face filling the panel, squared to camera, head level, eyes directly to camera, neutral expression, lips closed and relaxed. wearing a blue and cream striped crocheted string bikini. She accessorizes with a detailed gold chain necklace featuring multiple gold seashell and starfish charms, gold starfish stud earrings, and colorful beaded rings on her fingers. Every facial plane, the full eye construction, the brow, the nose, the lip shape, the facial hair and the hairline read at maximum detail.

CENTER PANEL — waist-up side view. Framed from just above the crown down to the belt line, seen in true ninety-degree left profile, standing upright, head level and facing straight ahead in profile, not turned toward camera, the near arm hanging relaxed at the side. The profile of the nose, lips and chin, the ear, the hair silhouette, the shoulder line,

RIGHT PANEL — full body front view, no head, no neck, and no hair. The body stands squared to camera from the shoulders down to the shoes, arms relaxed at the sides, hands open and loose, weight even across both feet, the footwear entirely inside the panel. There is no head, no neck, and no hair at all — nothing rises above the shoulder line, and no hair falls across the chest or shoulders. wearing a blue and cream striped crocheted string bikini. She accessorizes with a detailed gold chain necklace featuring multiple gold seashell and starfish charms, gold starfish stud earrings, and colorful beaded rings on her fingers.. The garment reads as worn by an invisible body — full volume, natural drape, real fabric tension across the chest and shoulders, real weight in the trouser flare — but nothing emerging from the neckline. No stump, no skin, no cut edge, no anatomy, no blood, not blurred, not faded, no ghosting, no transparency in the body. The panel keeps full headroom — generous empty field above the shoulders — so the figure sits at the same scale and position in the frame as a normal full-body portrait.

Skin renders at its true natural skin tone, identical in value and hue across the face, neck, arms and hands in every panel, never darkened, never tanned, never pale or washed-out or cool-shifted.

The background is a single flat 18% neutral gray field across all three panels — one uniform value at every pixel corner to corner, identical directly beside the figure and in the far corners of every panel, with no seam line, no gradient, no hotspot, no vignette, and no falloff to lighter or darker anywhere in the frame. It is a flat color field, not a photographed backdrop — no surface, no floor, no wall, no corner, no horizon, and no plane the figure stands on or in front of.

Relight from scratch overriding any reference lighting, identically in all three panels: completely flat shadowless illumination — one enormous soft frontal source at camera position wrapping the subject evenly, matched equal fill from camera-left and camera-right at identical intensity, matched fill from above and below, so both sides of the face read at exactly the same brightness. No key-and-fill ratio, no modelling, no shadow side, no cheek triangle, no nose shadow, no under-chin shadow, no rim light, no hair light, no kicker, no specular hotspot. Extremely low contrast, even, milky, catalogue-flat. Form is described by bone structure, hair strands, and fabric folds alone, not by light and shadow.

Absolutely zero shadow anywhere outside the subject in any panel. No cast shadow, no contact shadow, no floor shadow, no drop shadow, no ambient occlusion where the body meets the background, no soft darkening behind the shoulders or beneath the hem, no halo, no edge darkening, and no rim separating the figure from the field. Shading exists only on the subject and stops cleanly at the silhouette. Absolutely zero light bleed outside the subject — no spill, no glow, no bounce, no reflected color cast thrown from the skin or the wardrobe onto the background, and no brightening anywhere behind the figure.

Skin reads matte and velvety — zero shine on forehead, nose bridge, cheekbones, temples, and chin, no oily T-zone. Skin renders at its true natural skin tone and wardrobe at its true natural color, warmth preserved and natural against the neutral gray, never pale or washed-out or cool-shifted by the background. Real peach fuzz at the jaw and hairline, real soft fine even pore texture, subsurface scattering reading as semi-translucent biology, real hair rendered strand by strand with fine flyaways at the hairline, real fabric weave and drape, real metal surface detail on the jewelry, never plastic, never waxy, never glass-skin, never harsh — fine flattering texture that keeps the face looking good, no acne, no blemishes, no rough pores.

Even sharpness edge to edge across the entire frame. No depth-of-field falloff, no bokeh, no background blur, no lens vignette, no lens distortion, no flare, no bloom, no chromatic aberration, no atmospheric haze, no air between the subject and the background. Photographed on a 50mm prime, soft natural film grain. Photographed not generated.
那艘船 —— 空的 Riva Aquarama
The boat — an empty Riva Aquarama
道具參考,不要有人,但要看得到駕駛艙跟內裝。Soul Cinema:
A prop plate. No people, but the cockpit and interior have to read. Soul Cinema:
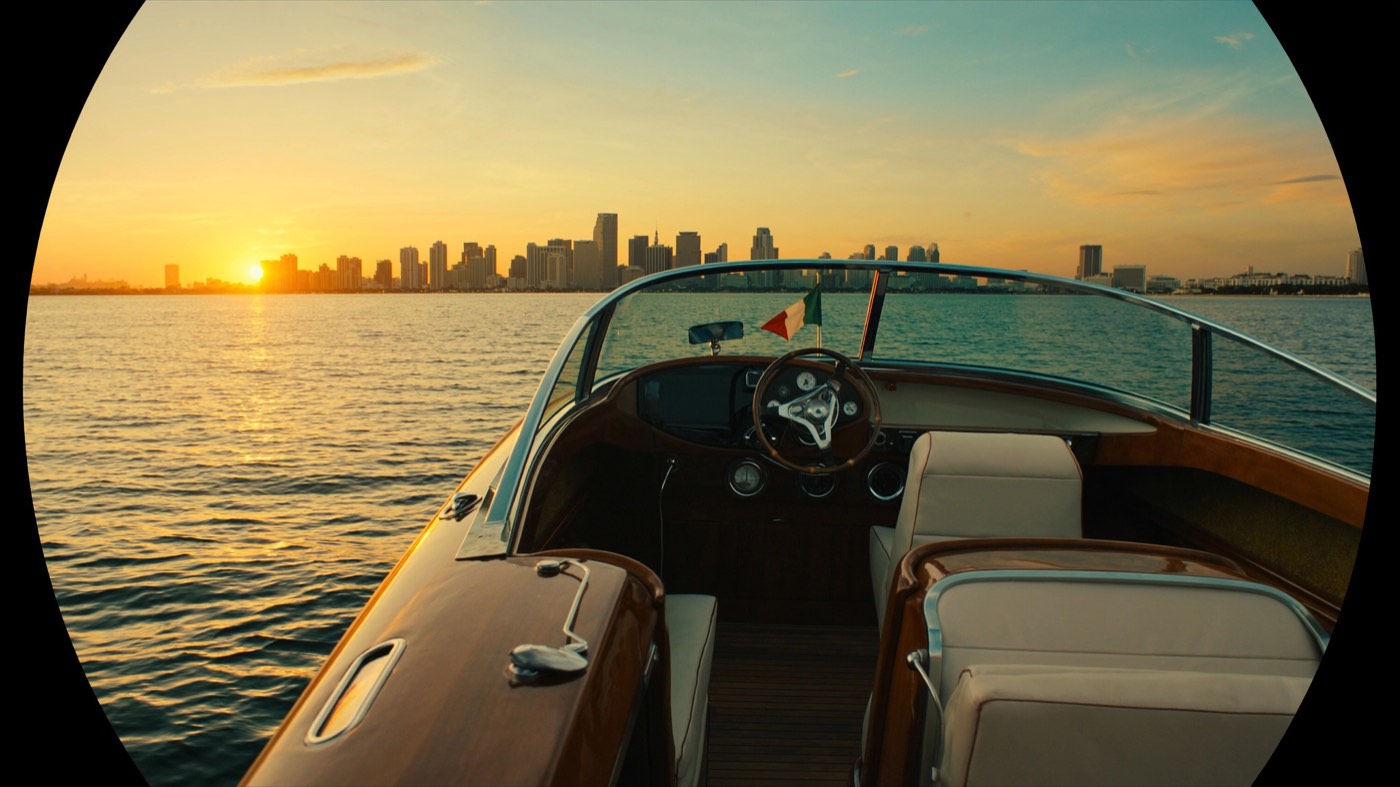
A cinematic anamorphic still photograph captured on a real cinema set, A photorealistic, side perspective view from the stern of an empty classic Riva Aquarama wooden runabout, looking forward through the open cockpit and over the mahogany dashboard, with a stunning sunset cityscape of Miami visible across the water. The boat's glossy mahogany deck and cream leather upholstery are central. Includes an Italian flag at the stern and no people. Golden hour lighting.
海豚 —— 一整群跳出水面
The dolphins — a whole pod, airborne
這張決定海豚+海面+天際線的氛圍。附上第 3 步的船圖當 mood,兩張色溫才會是同一支底片:
This one sets the dolphins, the water and the skyline at once. Attach the boat from step 3 as mood so both plates read as the same film stock:
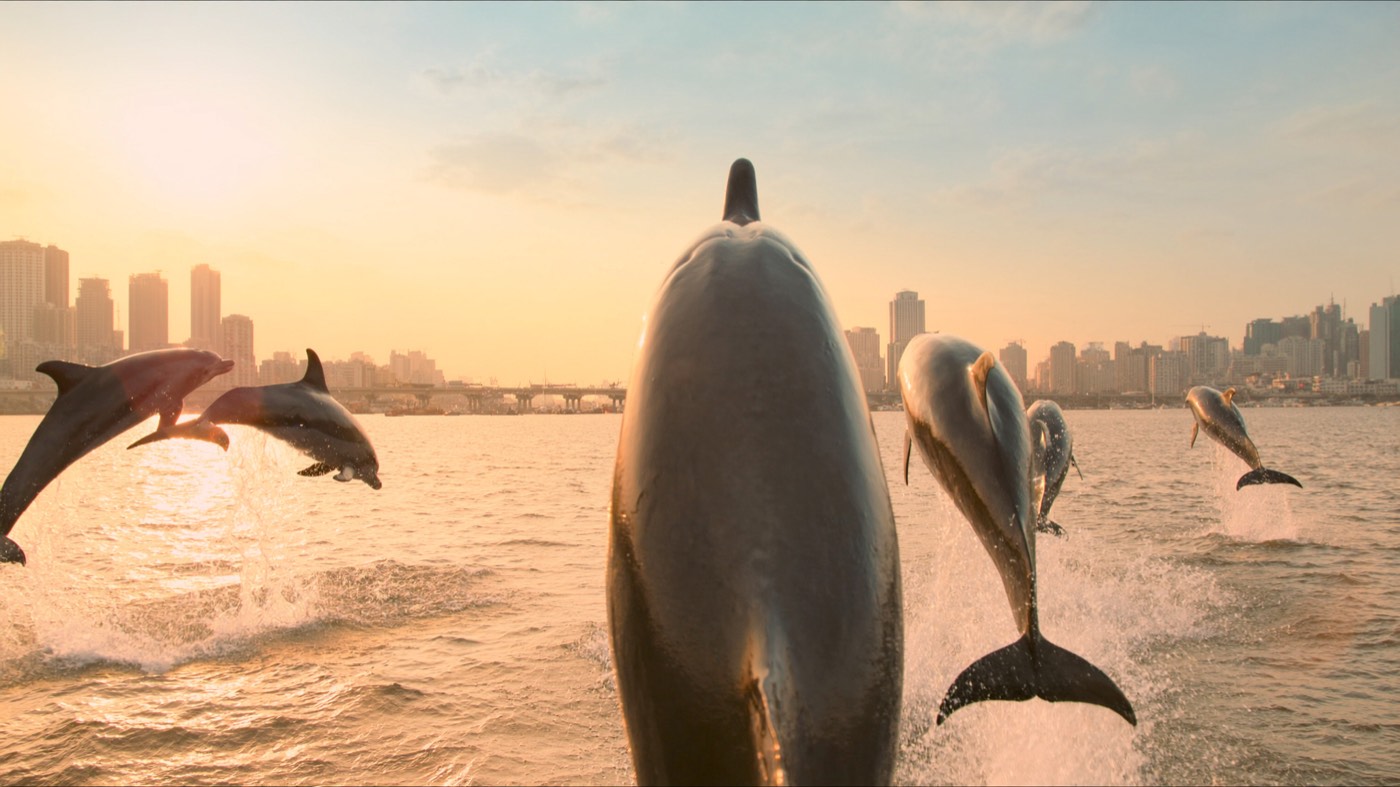
A realistic, low-angle photograph capturing a group of dolphins leaping in formation across the water at sunset, with a modern city skyline in the background. The central focus is a dolphin jumping directly away from the camera, its body angled upward, showing its tail flukes and sleek, wet back glistening in the golden light. Flanking the center are two other dolphins jumping symmetrically, while others follow behind. The dolphins create dramatic splashes and water spray, backlit by the setting sun. The background features a detailed skyline of high-rise buildings and a bridge under a warm, hazy orange sky. The water is textured with ripples and reflects the sunset colors. The shot is well-lit, capturing the texture of the dolphins' skin and the motion of the water.
Seedance 2.5 —— 把成片生出來
Seedance 2.5 — generate the film
灰模丟進影片欄位,參考圖照順序放,生出來的畫面就會照著你的運鏡跑。最後的剪接是我自己剪的。
Put the previz in the video slot, load the plates in order, and what comes back follows your camera move. The final edit is mine, cut by hand.
參考素材照這個順序放,Seedance 讀前面幾格最重,臉又是最先跑掉的:
Load the references in this order. Seedance reads the first slots hardest, and the face is the first thing to drift:
角色設定表(第 2 步)—— 臉、瀏海、比基尼、首飾
Character sheet (step 2) — face, fringe, bikini, jewellery
船(第 3 步)—— 桃花心木船身、奶油色皮椅、駕駛艙
Boat (step 3) — mahogany, cream leather, cockpit
海豚(第 4 步)—— 海豚、海面、天際線、夕陽
Dolphins (step 4) — animals, water, skyline, sun
Blender 灰模——一定要放在影片欄位,不要跟圖片混在一起。它只負責運鏡跟物件的時間點。
The Blender previz — it must go in the video slot, not among the images. It controls camera and timing only.
後製與踩雷筆記
Post & gotchas
- 角色設定表一定放第一格,不然長鏡頭跑到後面,臉會慢慢變成別人。
- Keep the character sheet in slot one, or the face drifts into someone else over a long take.
- prompt 裡面記得寫 NO BGM —— 音樂留到剪接自己配。
- Put NO BGM in the prompt — add your own music in the edit.
- 灰模輸出 720p、H.264 就好,檔案太大反而容易上傳失敗。
- Export the previz at 720p H.264; a big file just fails the upload.
- 我後製用 DaVinci Resolve,內建的 Film Look Creator 幾乎就把底片感做完了。
- I grade in DaVinci Resolve — the built-in Film Look Creator carries most of the film look on its own.
- Film Look Creator 我主要調 halation、bloom、grain,再加一點 gate weave 跟暗角——它同時也會把不同段 AI 畫面「黏」成同一支底片。
- In Film Look Creator I mostly work halation, bloom and grain, plus a touch of gate weave and vignette — it also glues the AI footage into one stock.
想照著做一次,三個東西就夠了:
Everything you need to run this yourself:
* 文中 Higgsfield 的連結是合作連結,你從這裡註冊我會拿到一點分潤,對你的價格沒有影響。工具是我自己在用的,不好用我不會寫。
* The Higgsfield links in this post are affiliate links — signing up through them earns me a small commission at no extra cost to you. These are the tools I actually use; I would not write this up otherwise.
喜歡這篇嗎?新文章與作品第一時間通知你。
留下 email —— 不寄垃圾信,只在有新的旅行隨筆、3D 作品或課程時捎個訊息給你。