Higgsfield 3D Jutsu —— 完全不用學的 3D,一句話長出場景,運鏡自己排
Higgsfield 3D Jutsu — 3D you never have to learn
3D Jutsu 是 Higgsfield 的 3D 場景編輯器:打一句話長出整個場景,自己搬相機、擺姿勢,然後在同一個視窗把灰模生成寫實影片。不用裝軟體,全程在瀏覽器。下面兩組範例,五支 prompt 全部公開,挑一組照著貼就能跑完。
3D Jutsu is Higgsfield’s 3D scene editor: type one sentence, get a whole scene, move the camera and pose the body yourself, then generate the photoreal film from the same window. Nothing to install. Two worked examples below, all five prompts published in full — pick one and paste your way through it.
30 秒看懂
The short version
AI 影片最痛的地方是你講不出你要的鏡頭。3D Jutsu 的解法是:先把場景真的做出來(醜的灰方塊就好),用滑鼠把相機拉到你要的位置、把人擺成你要的姿勢,然後才交給 AI 上色。所以鏡頭停在哪、第幾秒抬頭,都是你決定的。
The permanent pain of AI video is that you can’t say the shot out loud. 3D Jutsu’s answer: build the scene for real first — ugly grey boxes are fine — drag the camera where you want it, pose the body, and only then hand it to the AI to paint. Where the camera rests, which second she looks up: your call.
打一句話,場景長出來 —— 地板、牆、道具、角色都有。
Type one sentence and the scene grows — floor, walls, props, character.
滑鼠搬相機、轉物件、擺姿勢。跟 3D 軟體同一套邏輯。
Move the camera, rotate props, pose the body — same logic as any 3D app.
時間軸打 keyframe,決定第幾秒發生什麼。
Keyframe the timeline: what happens on which second.
丟角色設定表+場景參考圖,按下去,灰模變寫實。
Attach the character sheet and plates, hit generate, grey becomes real.
開工前
Before you start
- Higgsfield 帳號,3D Jutsu 就在裡面 —— higgsfield.ai · 3D Jutsu
- A Higgsfield account — 3D Jutsu lives inside it — higgsfield.ai · 3D Jutsu
- 一台電腦、一個瀏覽器。不用裝任何 3D 軟體,不用顯卡。
- A computer and a browser. No 3D software, no GPU.
- 一張三格角色設定表,兩組都會用到 —— prompt 在文末。
- One three-panel character sheet, used by both routes — prompt at the end.
介面速查
The interface in one minute
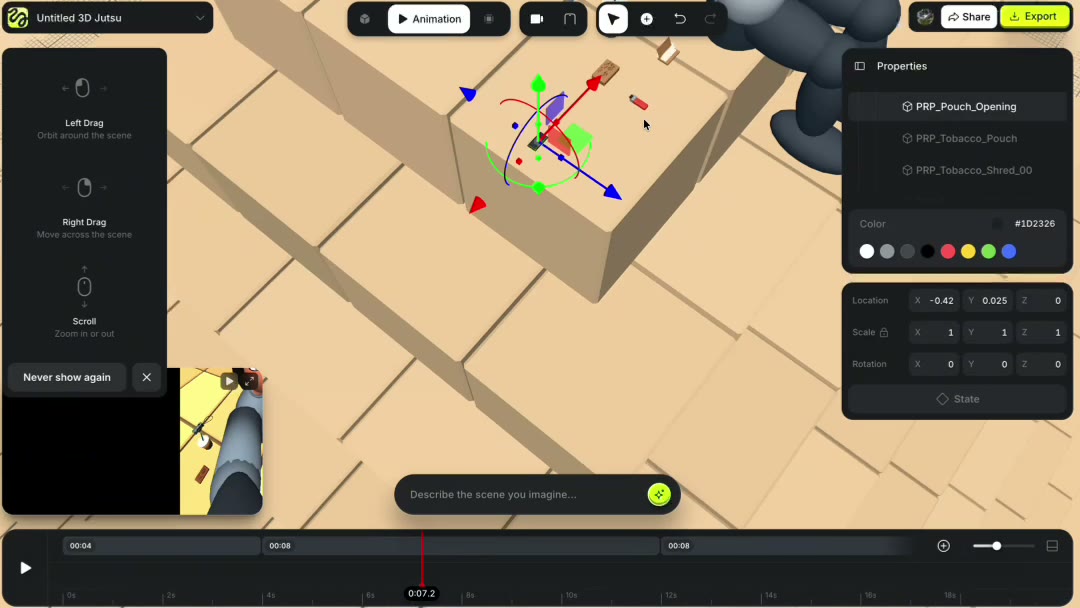
- 滑鼠:左鍵拖=繞著轉、右鍵拖=平移、滾輪=推拉。跟 Blender 一樣,但不用背快捷鍵。
- Mouse: left-drag orbits, right-drag pans, scroll dollies. Like Blender, minus the shortcuts.
- 命名規則:HERO_ 是主角、RIG_ 是骨架控制點(拉這個才會擺姿勢)、PRP_ 是道具。
- Naming: HERO_ is the lead, RIG_ are the rig handles you drag to pose, PRP_ are props.
- 要精準就打數字:右邊 Location / Rotation 直接輸入。Scale 旁邊有鎖,記得鎖起來才會等比例。
- For precision, type it: use Location / Rotation on the right. Lock the padlock beside Scale or things get stretched.
- 物件拖不動:它會跳 Object controls unlocked, release the entity and try the drag again —— 放開再拉一次就好。
- Object won’t move: the toast says Object controls unlocked, release the entity and try the drag again. Let go, drag again.
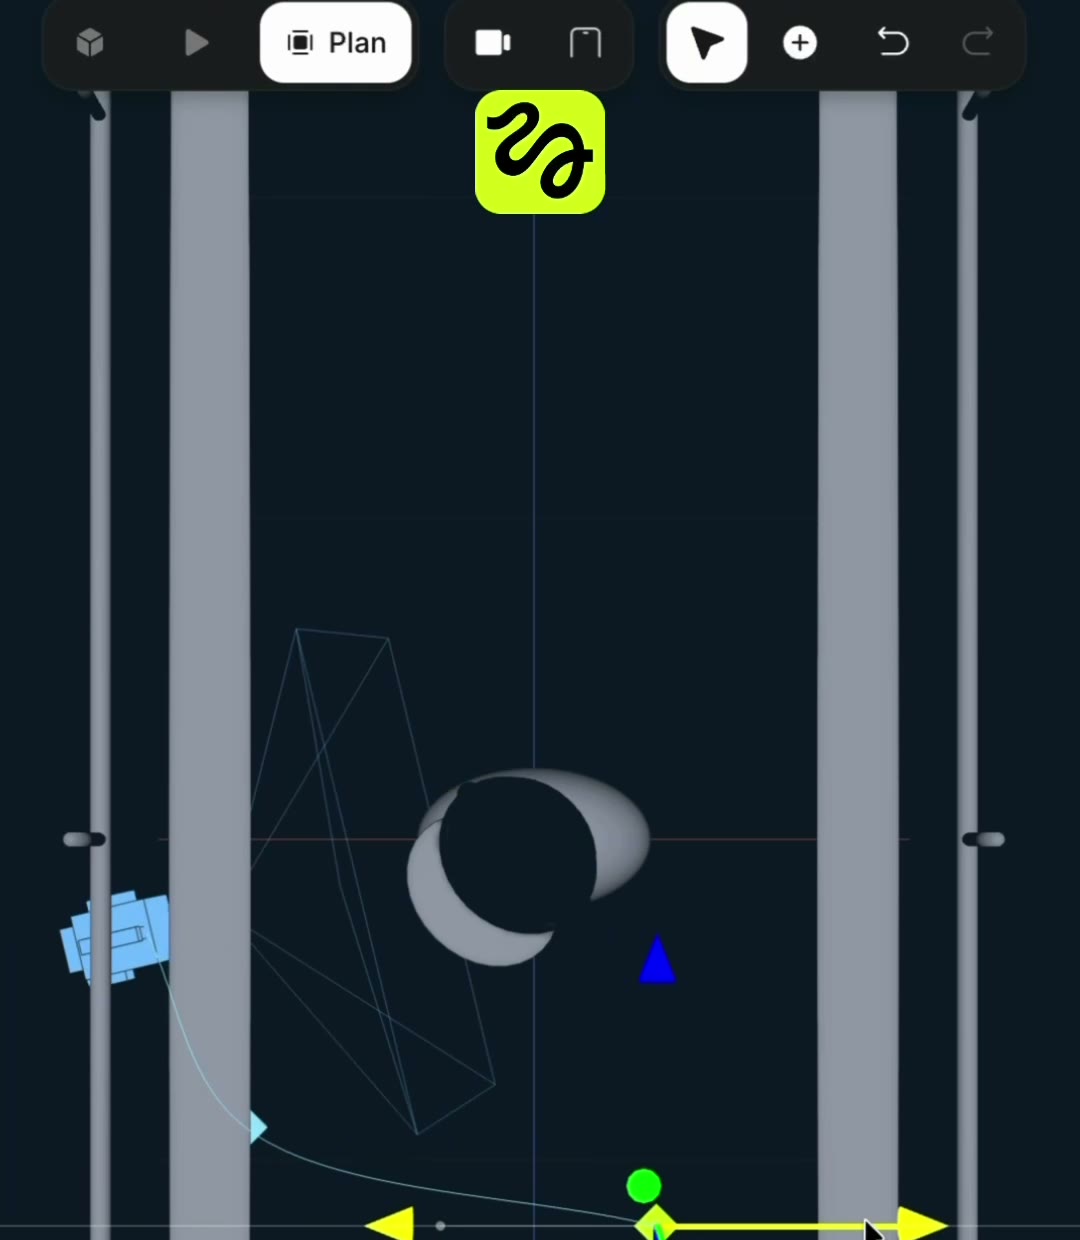
上面那顆 Plan 是最好用的:切過去變成由上往下的平面圖,相機變一個藍色小圖示,後面拖著一條運鏡曲線,直接拉那條線就是在排運鏡。
The Plan pill up top is the one that saves you: it flips to a top-down floor plan where the camera is a blue icon trailing a motion curve. Drag the curve, design the move.
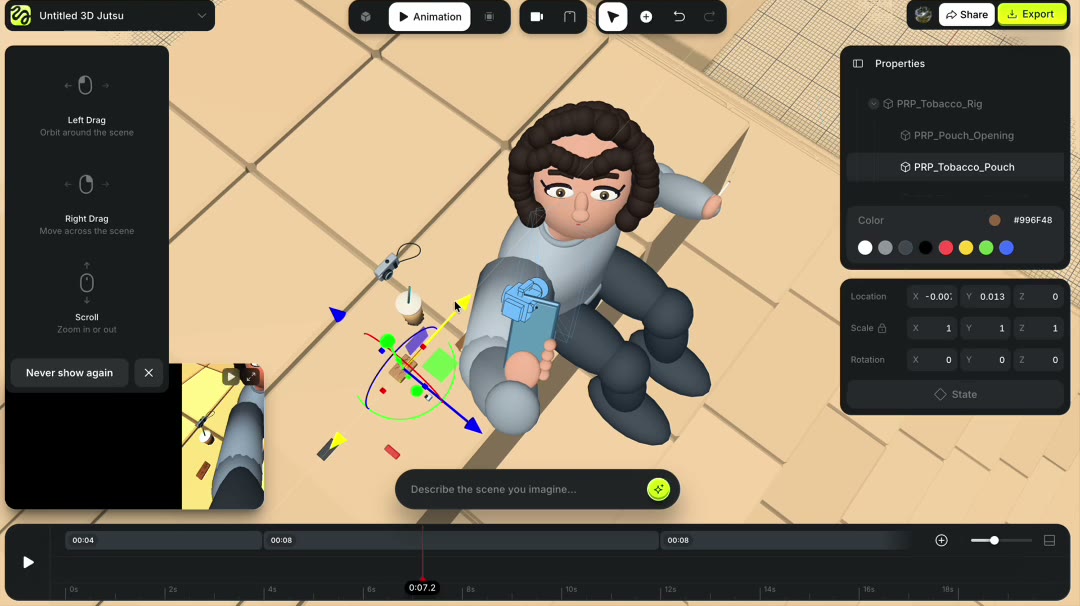
擺姿勢就點 RIG_ 控制點,畫面上會跳出 gizmo:箭頭移動、圓環旋轉。上面切到 Animation,下面時間軸就活了 —— 移動播放頭、擺好姿勢、按右下角 State 存起來,跳下一秒再擺一次,中間它自己補。
To pose, select a RIG_ handle and a gizmo appears: arrows move, rings rotate. Flip the top toggle to Animation and the timeline wakes up — park the playhead, set the pose, hit State bottom-right, jump forward, pose again. The in-betweens fill themselves.
選一組照著做
Pick a route
地鐵 · 8 秒橫式
站著不動、相機 360° 環繞。適合第一次做,鏡頭單純、時間短。
Subway · 8 s, 16:9
She stands still, the camera orbits 360°. Best for a first run: one simple move, short.
金字塔 · 20 秒直式
自拍視角、人會坐下來。難一點,但學得到怎麼指揮「動作」。
Pyramid · 20 s, 9:16
Selfie POV, and she sits down mid-shot. Harder, but it teaches you how to direct an action.
地鐵 · 8 秒橫式
Subway · 8 s, 16:9
人站在車廂中央不動,相機繞她轉一整圈,她的頭從頭到尾跟著鏡頭轉。三步:建場景 → 準備兩張參考圖 → 生成。
She stands still in the middle of the car while the camera makes one full orbit, and her head follows the lens the whole way. Three steps: build the scene, prepare two plates, generate.
A1 · 貼這句建場景
A1 · paste this to build the scene
貼進 3D Jutsu 畫面下方那條 Describe the scene you imagine…,按右邊綠色星星。
Paste it into the Describe the scene you imagine… bar at the bottom and hit the green spark.
A New York subway car interior, seen from inside the car.

SPACE: one long narrow carriage. Flat floor. A long bench seat along each side wall. Vertical grab poles running floor to ceiling, spaced evenly down both sides. Horizontal rails overhead. Sliding doors at both ends of the car. Rectangular windows along both walls. Flat ceiling panels. Rectangular advertising frames above the windows.

HERO: one young woman standing in the middle of the centre aisle, feet shoulder-width apart, arms relaxed at her sides, facing down the length of the car.

CAMERA: chest height, in the centre aisle, one metre in front of her, tilted slightly up, framed tight on her head and shoulders.

SCALE: the carriage is 2.7 m wide and 3.5 m tall. She is 1.65 m tall.

Grey blocking only. No lighting, no materials, no colour, no texture.
四行就夠:SPACE(空間長什麼樣)、HERO(人在哪、什麼姿勢)、CAMERA(鏡頭在哪、看哪)、SCALE(尺寸,不寫比例會亂)。最後那句 Grey blocking only 一定要留 —— 光線材質是下一步參考圖的工作。
Four lines carry it: SPACE, HERO, CAMERA, SCALE (leave scale out and proportions drift). Always keep that last line, Grey blocking only — light and materials are the plates’ job, not this one’s.
場景出來之後,用上面「介面速查」那些操作把相機繞成一圈、把頭的轉向排到時間軸上。
Once the scene lands, use the cheat sheet above to swing the camera through its orbit and key her head turns onto the timeline.
A2 · 準備兩張參考圖
A2 · prepare two plates
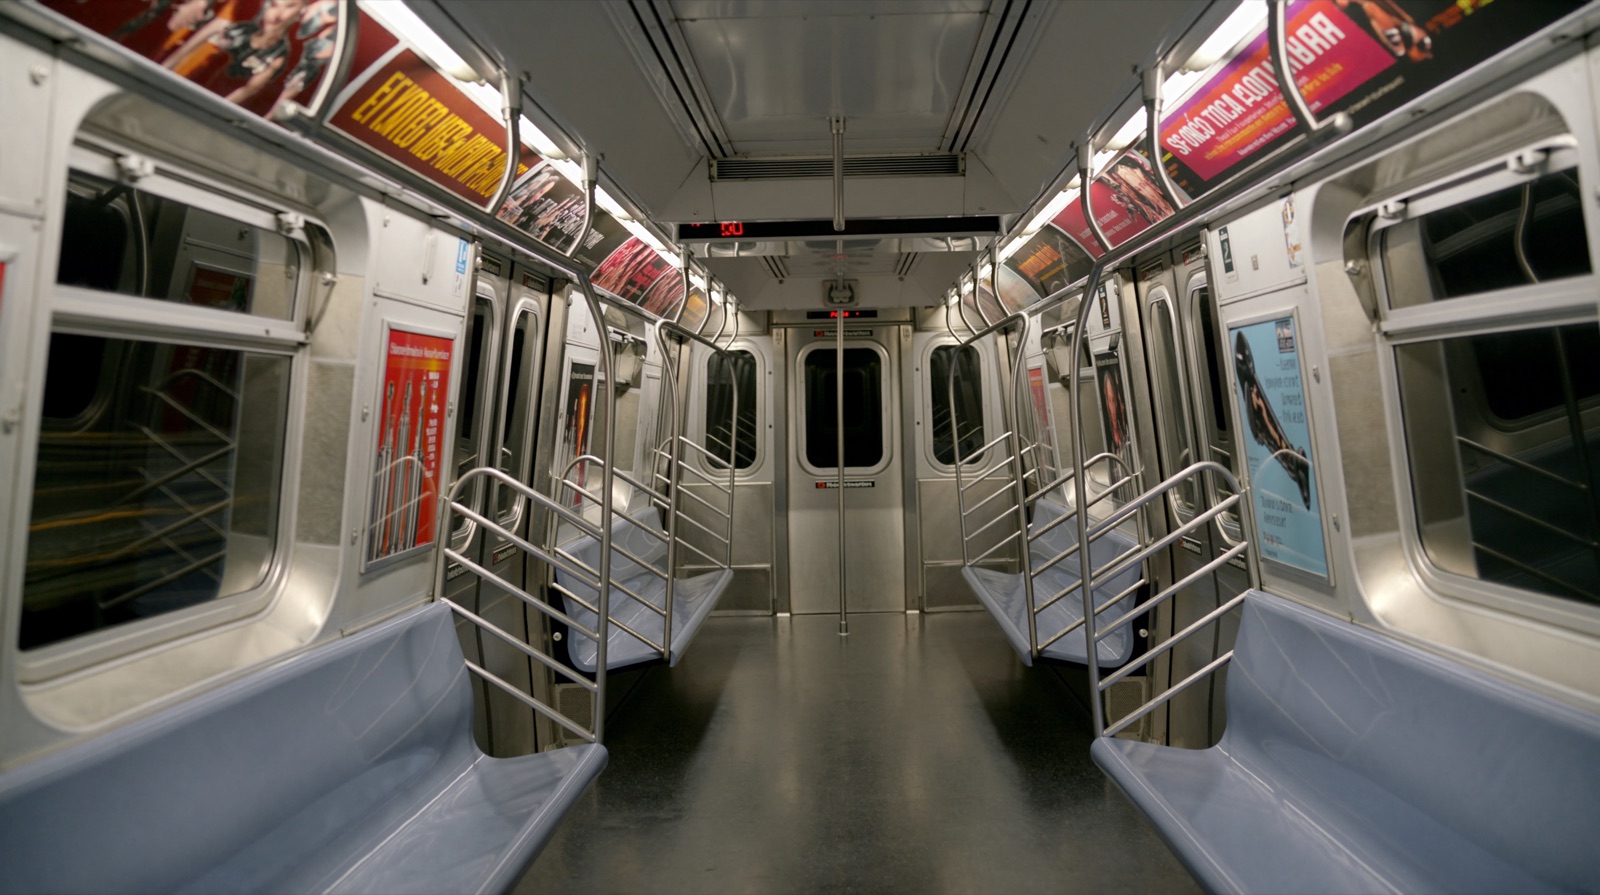
A3 · 貼這句生成
A3 · paste this to generate
這支 prompt 的重點是每兩秒一張 frame map:把第幾秒誰在畫面哪個座標寫死。一鏡到底的環繞鏡頭會不會散掉,就看這一段。
The spine of this prompt is a frame map every two seconds — who sits at which coordinate on which second. It is what keeps a one-take orbit from falling apart.
SCENE CONTEXT
An 8-second single continuous motion-control shot inside a moving subway car at night: a young woman rapper stands rooted at the center of the car and delivers four unhurried, meaningful bars straight into the lens while a robotic-arm camera performs one perfectly smooth 360-degree orbit around her head and shoulders, and she FOLLOWS THE CAMERA with her head the whole way, turning to keep her face and eyes on the lens even as it passes behind her, her hands carving the flow. Intimate, controlled, cinematic. Her rap is the only voice.

ACTIVE REFERENCES
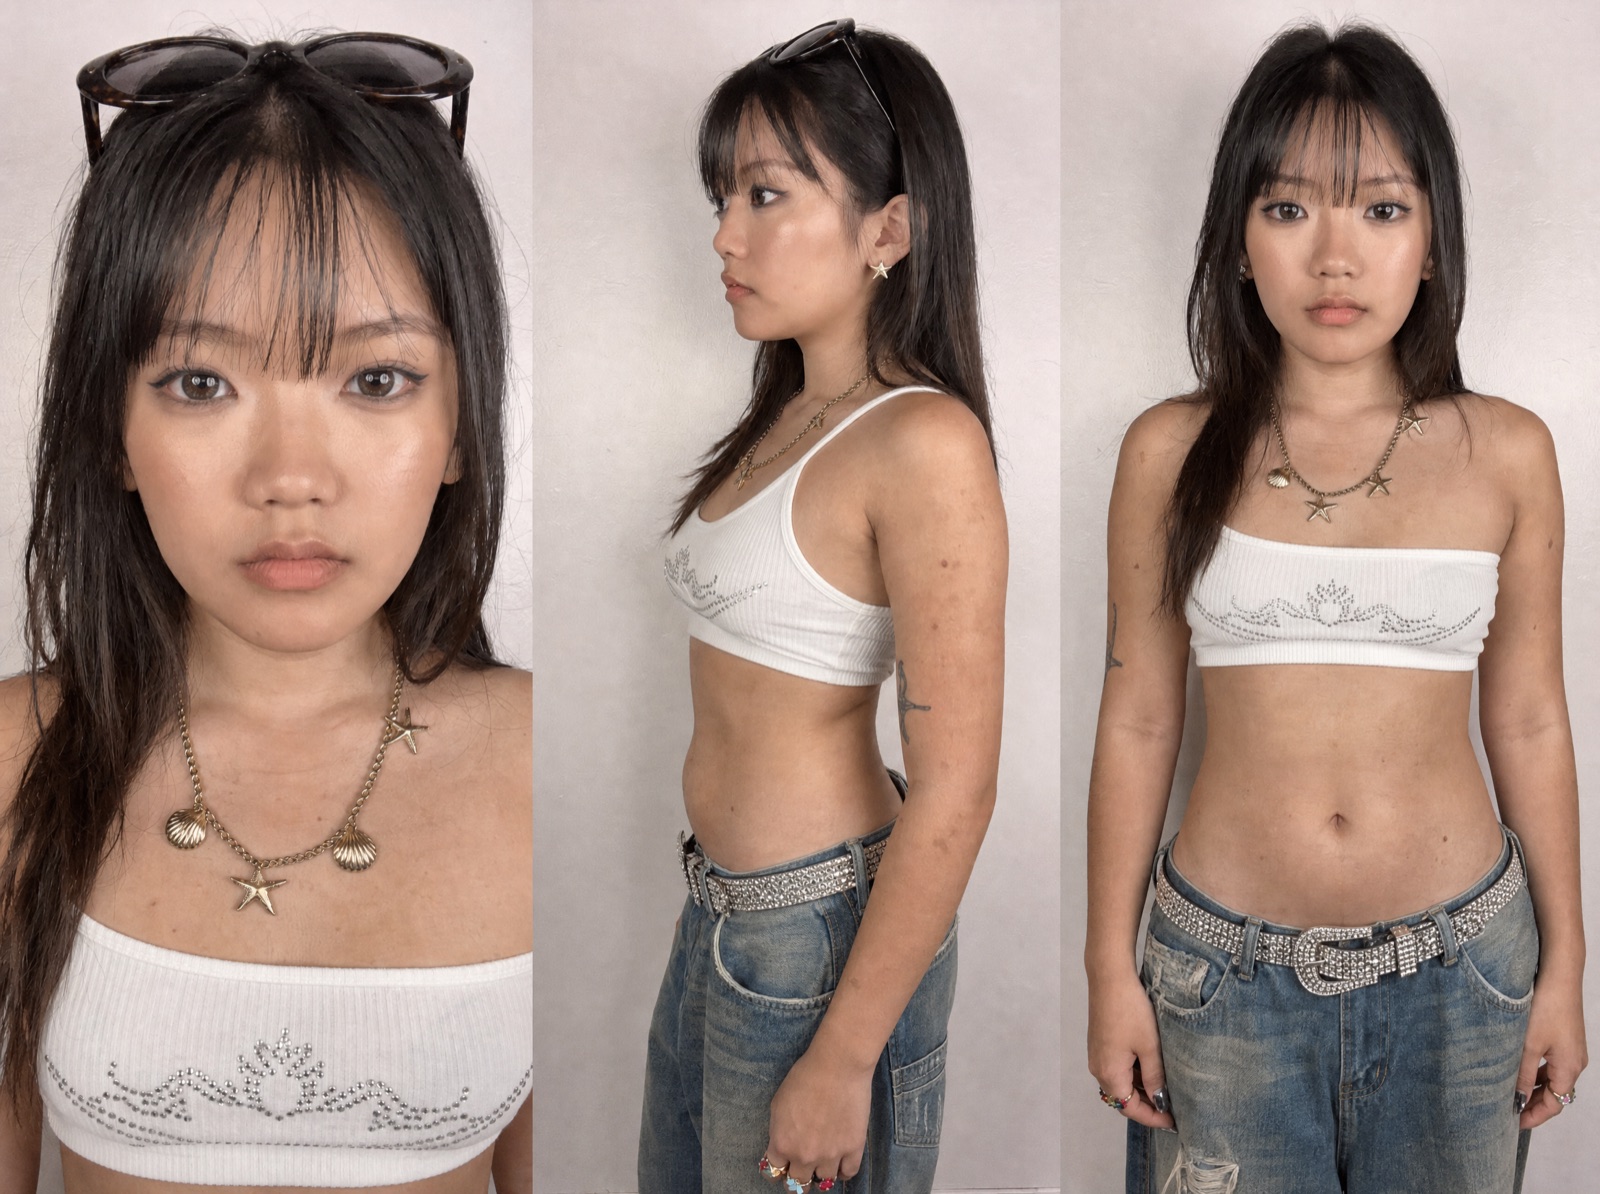
REF 1 · THE RAPPER. Early twenties, East/Southeast Asian, warm light-tan skin, dark brown eyes, soft natural makeup with a fine winged liner, calm composed face, full lips, a silver starfish stud in each ear. Hair exactly per the reference: long straight dark-brown hair with wispy blunt bangs across the brow, the length falling loose past her shoulders, a pair of tortoiseshell sunglasses pushed up on top of her head like a headband. Wardrobe exactly per the reference: a white ribbed strapless tube top with a silver rhinestone crown-and-wave motif across the front, a silver chain necklace hung with small starfish and seashell charms, several small colorful stacking rings on her fingers, a rhinestone belt with a jeweled buckle, low-rise distressed light-wash baggy jeans, a small fine-line tattoo on her left ribs. Her face, hair and full outfit stay identical for the whole shot; the sunglasses stay on top of her head and never come down.
REF 2 · THE CAMERA PATH AND THE FIGURE'S BEHAVIOUR. Take two things: (1) the camera move: a tight head-and-shoulders framing at chest height with a slight upward angle, one continuous smooth 360-degree orbit around a standing figure inside a subway car, beginning front-left, swinging around the far side and returning to the front, at a near-constant radius that closes slightly on the back half; (2) the figure's behavior: the body stays fixed in one spot for the entire shot while the HEAD CONTINUOUSLY TURNS TO FOLLOW THE CAMERA, keeping her face toward the lens through the whole orbit, including a look back over the shoulder as the camera passes behind. Nothing else from the previz (its grey materials, proxy geometry or lighting) is inherited.

LOCATION MAP
A generic New York subway car interior at night, in motion: stainless steel walls, molded plastic bench seats along each side, vertical steel grab poles and overhead rails, fluorescent ceiling panels, scuffed rubber flooring, advertising card slots above the windows holding only blank or blurred cards, the windows with darkness rushing past; periodic tunnel work-lights streaking through. The car is EMPTY except her. She stands in the open center aisle between two poles, feet planted shoulder-width, not holding on, balanced against the car's sway.

FIRST FRAME AND SPATIAL BLOCKING
The first visible frame is already the tight head-and-shoulders framing — there is no establishing wide.
Frame map at 0.0s: camera front-left of her at chest height, tilted slightly up. Her head at x 40-62%, y 18-70%, bangs across her brow, face turned to the lens, bare shoulders and the top of the white tube top spanning x 25-78% at the frame's lower edge; a grab pole passes vertically at x 15%; the window behind her at x 60-100%.
Frame map at 2.0s: the orbit is at her left side; her head has turned to follow it, face still square to the lens at x 42-60%, her shoulders now in three-quarter, her hair swinging slightly with the turn, the window streak-lights sliding past behind her.
Frame map at 4.0s: directly behind her: the back of her head and the fall of her hair at x 35-65%, y 15-75%, but her head is turned hard over her left shoulder, chin on the shoulder line, her face catching the lens past the curtain of hair; the far aisle and poles receding beyond, the tunnel black in the side windows.
Frame map at 6.0s: her right side: her head has swung around over the right shoulder to meet the camera, face square to the lens again at x 40-58%, the near window's passing lights catching on the starfish charms.

Scene settings — Duration: 8 s · Aspect ratio: 16:9
生出來就是文章最上面那支。從第一句 prompt 到成片,中間沒有開過任何 3D 軟體。
What comes back is the film at the top of this post. From the first sentence to the finished shot, no 3D application was ever opened.
金字塔 · 20 秒直式
Pyramid · 20 s, 9:16
自拍視角,人坐在金字塔頂端,開羅在腳下。比地鐵難的地方是中間有一個「坐下去」的動作,這支示範怎麼指揮動作。
Selfie POV on the summit of the Great Pyramid with Cairo below. What makes it harder than the subway is the sitting-down action in the middle — this one is about directing a movement.
B1 · 貼這句建場景
B1 · paste this to build the scene
The summit of the Great Pyramid of Giza at night, seen from on top of it.

SPACE: a small flat platform of large irregular limestone blocks at the very top. The pyramid's stepped faces fall away steeply on all four sides. Flat open desert far below. A second, smaller pyramid in the distance. A rectangular walled courtyard on the ground below.

HERO: one young woman sitting on the summit blocks, one knee drawn up, her right arm extended straight toward the camera as if holding a phone at arm's length.

PROPS: a small camera, a paper cup, a lighter and a phone lying on the stone beside her.

CAMERA: at the end of her extended arm, above her head and angled down onto her face — a selfie point of view — with the drop and the ground far below visible past her shoulder.

SCALE: the summit platform is about 10 m across. She is 1.65 m tall.

Grey blocking only. No lighting, no materials, no colour, no texture.
B2 · 準備三張參考圖
B2 · prepare three plates
這支用了三張,而且 prompt 裡每張都被指派了工作:
This one runs on three plates, and the prompt gives each of them a job:
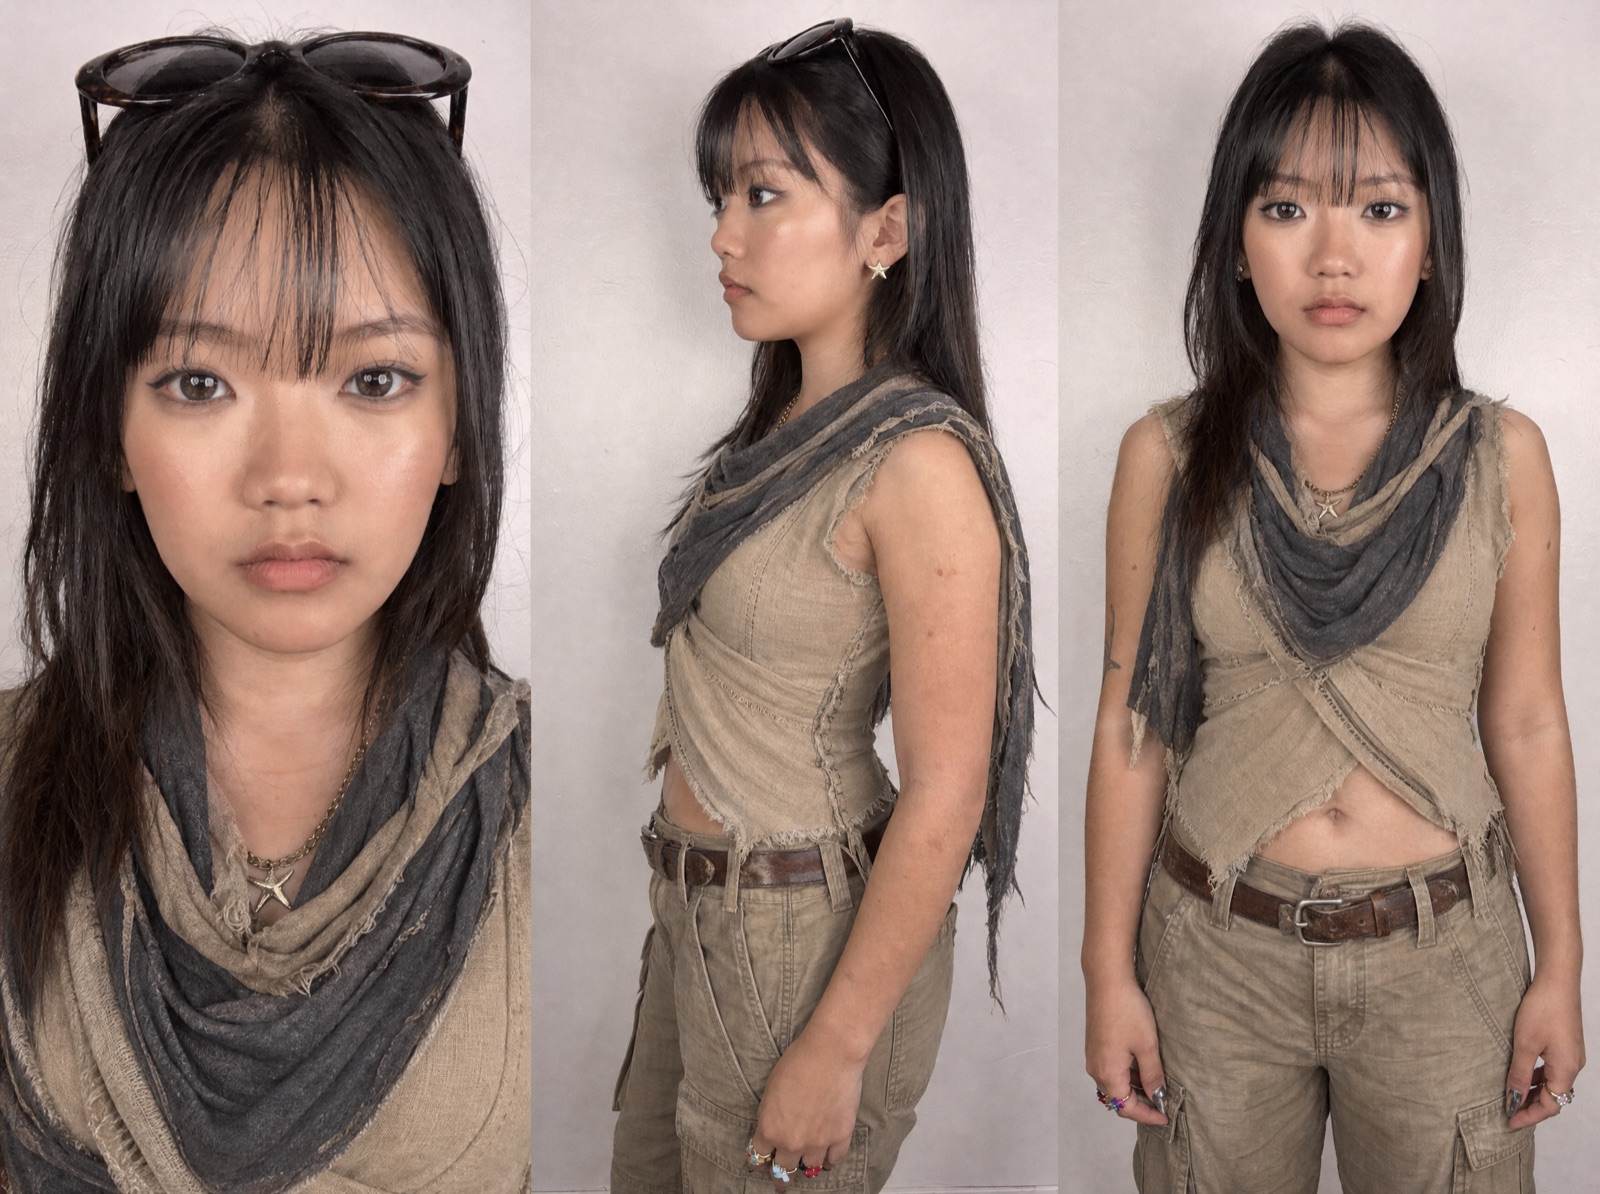
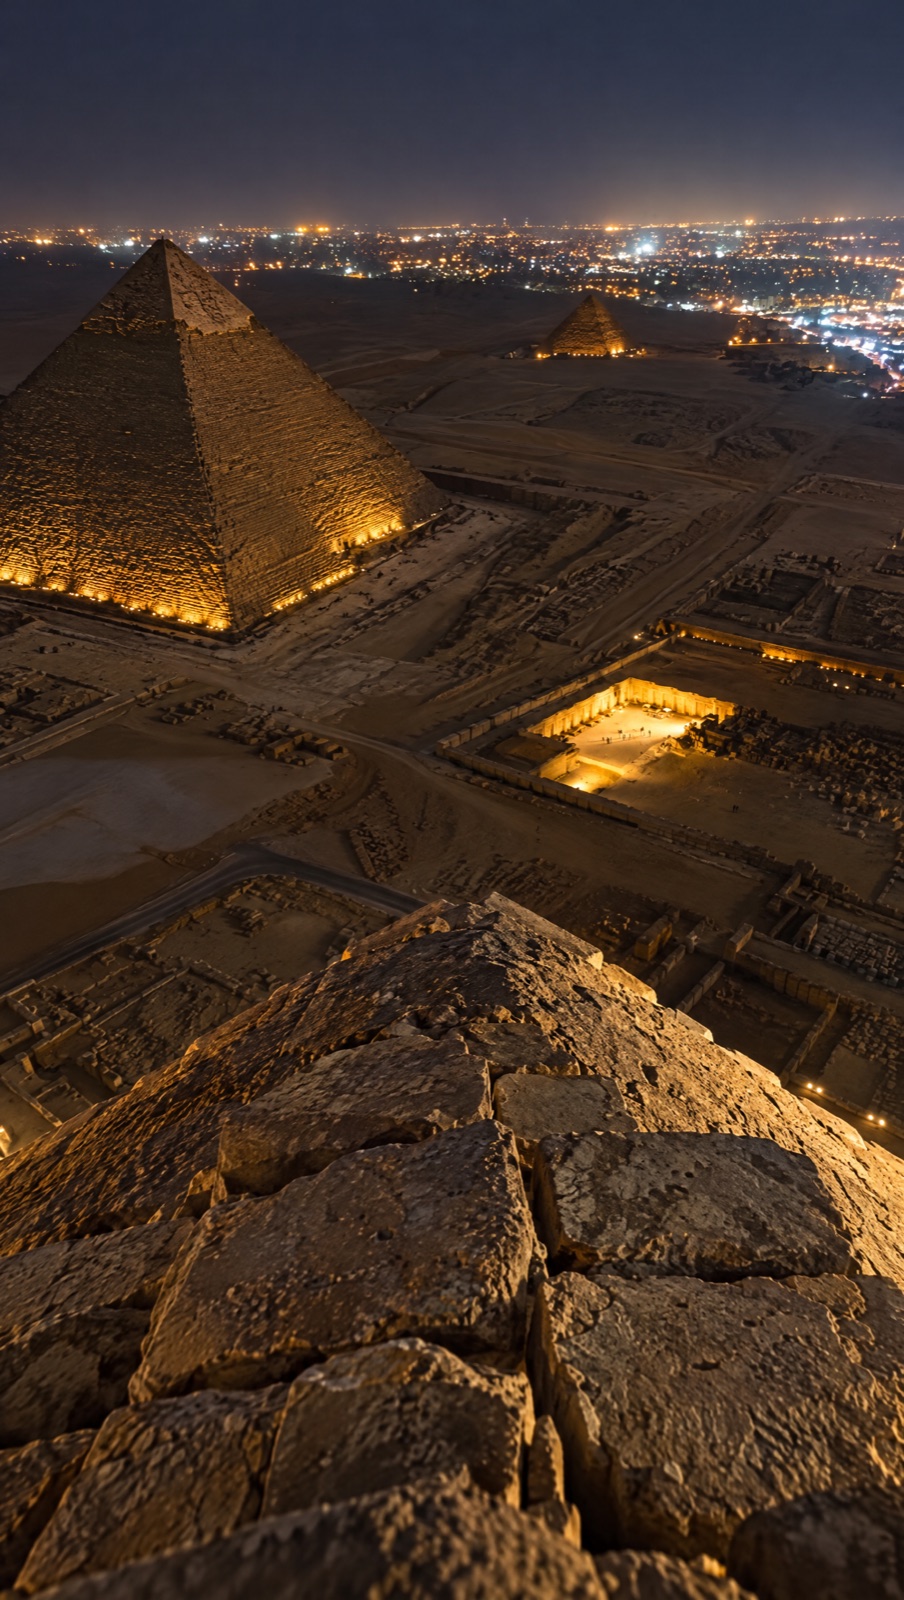
第三張 @Image3 是「坐下去」的分格動作參考,prompt 裡明講只借它的重心轉移跟撐手,不借它的鏡位跟背景。這種「指定參考只負責某一件事」的寫法,是這支最值得學的地方。
The third, @Image3, is a panelled guide for the act of sitting down. The prompt says outright to borrow only its weight transfer and supporting hand — not its camera angle or background. That trick, assigning one narrow job to one reference, is the thing worth stealing here.
B3 · 貼這句生成
B3 · paste this to generate
Create one continuous photoreal night take on the EXTERIOR summit of the Great Pyramid. @Video1 controls the camera's viewpoint, descent, tilt, roll, framing and rhythm; do not replace it with a fixed test camera.

REFERENCES: @Image1 controls the adult woman's identity, hair, sunglasses-on-head, jewelry and wardrobe. @Image2 controls the Giza night environment. @Image3 is the approved sitting-action guide: use its weight transfer and supporting-hand mechanics ONLY, not its camera angle, panel layout or background. Replace the previz's cartoon appearance and mechanical articulation with a believable real person.

GEOMETRY: Stay in open air above a SOLID CONVEX pyramid: exposed summit highest, four exterior faces falling outward and downward. The woman is on the apex, not inside a shaft. Keep real scale and parallax, chipped limestone, uneven sand and powder in joints. Far below, small camels wander independently across the plateau; distant pyramids and city lights establish height.

0-4s: Follow the original overhead approach toward the standing woman. Keep her body, hands and surrounding stone spatially coherent as the camera gets closer.

4-11s: Continue the source camera's moving face-oriented view. Use the approved sitting sequence from @Image3: bend the supporting knee, lean slightly forward, plant the EMPTY anatomical LEFT palm on the stone beside the hip, lower the first leg, then control the hips backward and down with modest physical effort. Bring the remaining leg down only after the pelvis is securely seated. The RIGHT hand retains the phone. The left palm visibly supports weight, then rests naturally on the stone until the later cup pickup. No cigarette or smoking gesture appears in either hand.

The head, shoulders, elbows and wrists respond naturally to balance and weight. Eyes can lead small head turns; breathing and blinks are subtle and irregular. Maintain connected anatomy and realistic limb lengths. Avoid rigid puppet movement, snapping head rotations, floating hips and fingers passing through objects.

11-20s: Follow the original camera's continuous transition into the downward view along her seated thighs, legs and the vast landscape. Keep the legs relaxed and mostly still, with no repeated kicking or rhythmic swinging. Her LEFT hand holds ONE clear plastic bubble-tea cup, with its base lightly resting on her left thigh. The grip stays anatomically correct and relaxed. After pickup, no duplicate cup remains on the stone.

CUP PHYSICS: Tan milk tea and separate dark tapioca pearls respond naturally when the cup is picked up and placed on the thigh. A small liquid ripple lags behind the movement; pearls slide or roll slightly along the cup bottom, then settle. They are not printed dots or rigid decorations suspended in the liquid. Keep the straw secured by the lid and the liquid surface governed by gravity.

LOOK: Realistic phone-LED/flash-lit night exposure: neutral-white near-lens light, rapid falloff, natural skin texture and plausible shadows. Distant pyramid and city lights stay warm and dim. Focus favors her eyes in the close section, then the near hand, cup and thighs; distant pyramids are only slightly soft, without excessive bokeh or cutout halos. Hair ends move very gently in a light breeze. During the final 17-20s, occasional fine wind-blown dust passes near the lens with natural defocus, accompanied by tiny irregular handheld micro-corrections, not strong shaking or a fog overlay.

Preserve one CCD camera with wrist strap, one open tobacco pouch, rolling papers and a red lighter on the stone at her right side. Keep the same reference outfit, including its X-crossed wrap construction and frayed scarf. One woman, one continuous take, zero added cuts, zero cartoon frames, zero held cigarettes, zero reference-sheet labels. Preserve any untargeted source text; add no graphics or watermarks. Audio: silent.
- 每個參考都被指派工作。@Video1 管運鏡、@Image1 管臉跟衣服、@Image2 管環境光、@Image3 只管坐下的重心 —— 而且明講不要拿它的鏡位。
- Every reference gets a job. @Video1 the camera, @Image1 face and wardrobe, @Image2 ambient light, @Image3 only the weight transfer — and it says not to take that plate’s angle.
- 動作寫成時間段,不是形容詞。0–4s 靠近、4–11s 坐下、11–20s 往下看,每段講清楚哪隻手在幹嘛。
- Action as time ranges, not adjectives. 0–4s approach, 4–11s sit, 11–20s look down — each saying what each hand is doing.
- 物理要自己講。那段 CUP PHYSICS 把珍珠會滑、液面會晃寫出來 —— 不寫的話珍珠會變成印在杯子上的圖案。
- Spell out the physics. That CUP PHYSICS paragraph is the difference between real tapioca and dots printed on the cup.
- 結尾一定要有負面清單。zero added cuts、zero cartoon frames、zero held cigarettes、no watermarks —— AI 最愛自己加戲的地方全部先堵掉。
- Always close with a negative list. zero added cuts, zero cartoon frames, zero held cigarettes, no watermarks — every place the model likes to improvise, shut in advance.
角色設定表 Prompt(兩組都用這張)
The character sheet prompt (both routes)
角色設定表做一次可以一直用,它決定臉會不會在鏡頭裡慢慢變成別人。跑的時候附上你自己的照片,[WARDROBE] 那行換成這次的衣服就好。
You make the character sheet once and reuse it forever — it is what stops the face drifting into someone else mid-shot. Attach your own photo when you run it, and swap the [WARDROBE] line for whatever you are wearing.
A three-panel character reference sheet composed as one horizontal frame, divided into three equal vertical panels side by side, a thin clean separation between panels, the same girl in the same outfit rendered identically across all three. No text, no labels, no numbering anywhere in the image.

The attached photograph carries the face, bone structure, skin tone, build and proportions. Her hair is exactly as it appears in the reference — the same length, cut, texture and part, not restyled and not lengthened — and her makeup is exactly as it appears in the reference.

[WARDROBE] ← describe the full outfit here, head to toe, including jewellery. The outfit is identical in every panel, the same print at the same scale. No eyewear, no hat, no jacket, no bag, no logos, no graphics.

LEFT PANEL — tight chest-up front view. Framed from just above the crown down to the collarbones with the face filling the panel, squared to camera, head level, eyes directly to camera, neutral expression, lips closed and relaxed. Every facial plane, the full eye construction, the brow, the nose, the lip shape and the hairline read at maximum detail.

CENTER PANEL — waist-up side view. Framed from just above the crown down to the belt line, in true ninety-degree profile, standing upright, head level and facing straight ahead in profile, not turned toward camera, the near arm hanging relaxed. The profile of the nose, lips and chin, the ear, the hair silhouette and the shoulder line all read clearly.

RIGHT PANEL — full body front view. The body stands squared to camera from the shoulders down to the shoes, arms relaxed at the sides, hands open and loose, weight even across both feet, the footwear entirely inside the panel.

Skin renders at its true natural skin tone, identical in value and hue across the face, neck, arms and hands in every panel — never darkened, never tanned, never pale, never cool-shifted.

The background is a single flat neutral grey field across all three panels — one uniform value corner to corner, no seam, no gradient, no hotspot, no vignette. It is a flat colour field, not a photographed backdrop: no floor, no wall, no corner, no horizon, no plane she stands on.

Relight from scratch, identically in all three panels: completely flat shadowless illumination, one enormous soft frontal source at camera position, matched equal fill left and right and above and below, so both sides of the face read at exactly the same brightness. No shadow side, no nose shadow, no under-chin shadow, no rim light, no specular hotspot. Extremely low contrast, even, catalogue-flat.

Absolutely zero shadow anywhere outside the subject in any panel — no cast shadow, no contact shadow, no drop shadow, no ambient occlusion where the body meets the background, no halo, no edge darkening. Shading exists only on the subject and stops cleanly at the silhouette.

Skin reads matte and velvety with real fine pore texture, real peach fuzz at the jaw and hairline, hair rendered strand by strand with fine flyaways, real fabric weave and drape, real metal detail on the jewellery. Never plastic, never waxy, never glass-skin. No acne, no blemishes.

Even sharpness edge to edge across the entire frame. No depth-of-field falloff, no bokeh, no background blur, no vignette, no lens distortion, no flare, no bloom, no chromatic aberration, no haze. Photographed on a 50 mm prime, soft natural film grain. Photographed, not generated.
踩雷筆記
Gotchas
- 角色設定表永遠放第一張。放第二第三張,鏡頭一長臉就會慢慢變成別人。
- Character sheet in slot one, always. Anywhere else and the face slowly turns into someone else.
- 場景 prompt 不要寫光線、不要寫「電影感」—— 那是參考圖的工作,寫進去只會打架。
- Keep light and “cinematic” out of the scene prompt — the plates handle that, and the two will fight.
- 參考圖的時間要對。夜景鏡頭配白天的參考圖,出來會很怪而且你找不到原因。
- Match the hour. A night shot with a daylight plate comes back wrong in a way that is hard to diagnose.
- 灰模不用做得漂亮。方塊跟球就夠了,它讀的是位置跟時間點,不是造型。
- The blocking does not need to look good — boxes and spheres are enough. It reads position and timing, not shape.
- 8 秒一顆鏡頭最穩。想要長的就排多顆最後自己剪,不要硬塞在同一顆裡。
- Eight seconds a shot is the sweet spot. Want longer? Lay down several and cut them yourself.
- 後製我用 DaVinci Resolve 的 Film Look Creator(halation、bloom、grain、一點 gate weave),它會把不同段畫面黏成同一支底片。
- I grade in DaVinci Resolve’s Film Look Creator — halation, bloom, grain, a touch of gate weave — it glues separate generations into one stock.
想照著做一次,其實只有兩個東西:
Everything you need to run this yourself:
* 文中 Higgsfield 的連結是合作連結,你從這裡註冊我會拿到一點分潤,對你的價格沒有影響。工具是我自己在用的,不好用我不會寫。
* The Higgsfield links in this post are affiliate links — signing up through them earns me a small commission at no extra cost to you. These are the tools I actually use; I would not write this up otherwise.
喜歡這篇嗎?新文章與作品第一時間通知你。
留下 email —— 不寄垃圾信,只在有新的旅行隨筆、3D 作品或課程時捎個訊息給你。